


Forum › Guides
Read-only archive of the old forum. To ask questions or discuss, join us on Discord.
Topics
Dragon Crusade on Mobile – Installation & Setup Guide
DANI 20.01.2026
Click here- Play On Mobile Wiki Guide
TL;DR – Quick Start
Playing Dragon Crusade on your phone is easier than you think! Here's what you need to do:
1. Download the Star app (a Windows emulator for Android) and install it on your phone
2. Download the Dragon Crusade game client to your phone's Downloads folder
3. Open Star and create a new "container" (think of it as a virtual PC)
4. Configure some settings to make the game run smoothly
5. Launch the game and start playing!
What You'll Need:
- Star-11.apk: Download from GitHub
- Dragon Crusade Client: Download from dragon-crusade.one
- An Android smartphone (the more powerful, the better)
***
Step-by-Step Installation
Spoiler
What to download:
1. Star-11.apk – This is the app that lets you run Windows programs on Android
- Download link: https://github.com/jacojayy/star/releases/tag/star.11-2
- Save it anywhere on your phone
2. Dragon Crusade Client – The actual game files
- Download from: dragon-crusade.one
- You can download either the installer OR the full client ZIP file
- Important: Save it directly to your phone's Downloads folder
For beginners: The Downloads folder is usually located at "Internal Storage > Download" or you can access it through your phone's file manager app.
Spoiler
Installing Star:
1. Find the Star-11.apk file you downloaded
2. Tap on it to install (you may need to allow "Install from unknown sources" in your phone's settings)
3. Once installed, open the Star app
Extracting the Dragon Crusade Client:
If you downloaded the ZIP file, you need to extract it first:
1. Download a file extraction app from the Play Store (like "ZArchiver" or "RAR")
2. Open your extraction app and navigate to your Downloads folder
3. Find the Dragon Crusade ZIP file
4. Tap on it and select "Extract here" or "Extract to..."
5. Extract it directly in your Downloads folder
Note: If you downloaded the installer instead, skip the extraction step – you'll run the installer later from inside Star.
Spoiler
A "container" is like a virtual Windows PC running on your phone. Here's how to create one:
1. Open the Star app
2. Tap the plus (+) icon in the top-right corner
3. Give it a name (e.g., "MMORPG" or "DragonCrusade")
4. Now you'll see many configuration options – don't panic! Follow the screenshots below exactly:
Container Configuration Settings:
Screen & Display:

Graphics Settings:

Wine Configuration:

Box Settings:

Additional Settings (1/5):

Additional Settings (2/5):

Additional Settings (3/5):

Additional Settings (4/5):

Additional Settings (5/5):

5. After configuring everything, tap Save or Create
Spoiler
These settings help the game run better:
1. Tap the menu icon (☰) in the top-left corner of Star
2. Go to Star → Settings
3. Set the following:
- Box64 version: 0.3.6
- Preset: Performance
4. Tap Save
Spoiler
Now let's get the game files into your virtual Windows:
1. Tap the Play button next to your container (e.g., "MMORPG")
2. Wait for the virtual Windows desktop to load
3. You'll see a file explorer – open D: drive
4. Inside D: drive, you'll see your phone's Download folder
5. Find your Dragon Crusade files here
If you downloaded the ZIP file:
- If you already extracted it in your Downloads folder, you should see the Dragon Crusade folder
- Open it and find DragonCrusade AlternativePatcher.exe
If you downloaded the installer:
- Find the installer file and double-tap to run it
- Install the game (you can install it in the container or keep it in Downloads)
- After installation, find DragonCrusade AlternativePatcher.exe
If you need to extract inside the container:
- Right-click on the ZIP file
- Select "Extract here" or use a Windows extraction tool
Spoiler
This is important – you need controls to play on your phone!
Option 1: Import Ready-Made Controls (Easiest)
1. Download this control file to your phone: MMORPG.icp
2. Press your phone's Back button to exit the container
3. Tap on Input Controls in Star
4. Tap the import/folder icon
5. Find and select the MMORPG.icp file you downloaded
6. Name the profile "MMORPG" or "DragonCrusade"
Option 2: Create Your Own Controls
1. Press your phone's Back button
2. Go to Input Controls
3. Create a new profile
4. Manually position buttons where you want them
Here's how the imported controls look:


Important Note: The default controls use number keys 1-9. You'll need to change your in-game keybinds from F1-F9 to 1-9 for the buttons to work!
Spoiler
You're almost there!
1. Open your container again (tap the Play button)
2. Navigate to your Dragon Crusade folder (D: drive → Download → Dragon Crusade folder)
3. Double-tap DragonCrusade AlternativePatcher.exe
4. The patcher will open and update the game if needed
5. Click Start Game
6. Wait for the game to load
Loading your controls:
1. Once in-game, press your phone's Back button
2. Go to Input Controls
3. Select your "MMORPG" or "DragonCrusade" profile
4. The controls will now appear on screen!
Spoiler
How to use your touchscreen as a mouse:
- Move the mouse: Touch and drag anywhere on the screen
- Left-click: Single tap
- Right-click: Hold one finger on screen, then tap with a second finger
- Right-click drag: Hold one finger, then drag with a second finger
For better performance:
1. Open the game's Options/Settings menu
2. Set ALL graphics settings to LOW
3. This will make the game run much smoother on your phone
Spoiler
If you see performance information (FPS counter, etc.) on your screen and want to remove it:
1. Go back to your container settings (before launching the game)
2. Find Environment Variables
3. Look for the variable DXVK_HUD
4. Delete or disable this variable
5. Save and restart the container
***
Troubleshooting Tips
Game won't start?
- Make sure you configured the container exactly as shown in the screenshots
- Try setting Box64 to version 0.3.6 in Star settings
- Restart your phone and try again
Game is too laggy?
- Lower ALL graphics settings in-game
- Make sure Star Preset is set to "Performance"
- Close other apps running in the background
Can't find the Download folder in D: drive?
- Make sure Star has storage permissions
- Check that you extracted/downloaded the game to your phone's Downloads folder, not an SD card
Controls not working?
- Make sure you loaded the Input Controls profile
- Check that you changed in-game keybinds from F1-F9 to 1-9
***
That's it! You're ready to play Dragon Crusade on your phone. Have fun grinding!
If you have any questions or run into issues, feel free to ask in this thread!
Dragon Ascension System - Complete Guide
DANI 03.08.2025
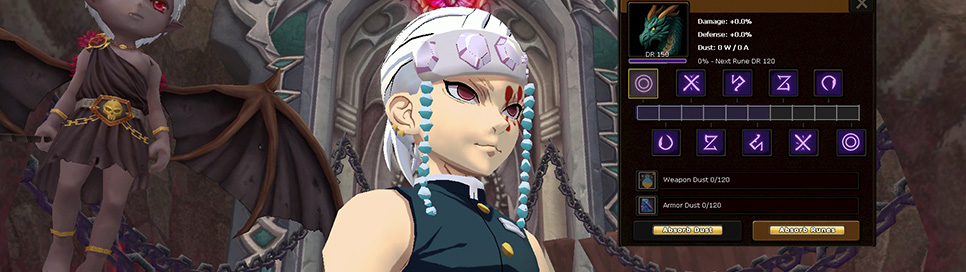
Overview
The Dragon Ascension System is an advanced progression feature that provides significant combat bonuses through Dragon Power accumulation and Rune placement. This system is essential for end-game content and competitive play.
Key Benefits:
• Damage increase up to +100% (with active dragon companion)
• Defense improvement up to +22% survivability
• 10 unique rune slots with various passive bonuses
• Visual progression through dragon companion evolution
Important: Without an active dragon companion, players suffer a -50% damage penalty and +10% incoming damage increase.
Getting Started - Dragon Companion
Obtaining Veyrindor
To access the Dragon Ascension system, you must first obtain the dragon companion "Veyrindor":

Method 1: Flaris Bangs Gate Quest
• Location: Gate near Bangs in Flaris
• Complete the quest chain to receive Veyrindor
Method 2: Level 60 Reward
• Automatically received upon reaching level 60
Method 3: Vote Shop
• Purchase using accumulated vote points
Note: Advanced dragon companions can be obtained from Dragon Rank dungeons later in progression. All companions can be switched freely without losing Dragon Ascension progress.
Accessing the System
To open the Dragon Ascension interface:
1. Ensure your dragon companion is active (visible buff icon)
2. Click on the dragon/angel buff icon in your status bar
3. The Dragon Ascension window will open
Dragon Power System
Understanding Dragon Power
Dragon Power is the core progression metric, ranging from 0 to 350 points. Your damage and defense bonuses scale directly with your current Dragon Power level.
Required Materials
Weapon Dust
• Source: Dismantle dungeon weapons at the Weapon Dust NPC
• Function: Primary material for Dragon Power advancement
Armor Heartstone
• Source: Dismantle dungeon armor at the Weapon Dust NPC
• Function: Secondary material required for Dragon Power advancement
Put Dungeon Set Parts and Weapons into the Armament Meltdown (Via Weapon Reroll BoboChan NPC)

Absorption Process
1. Place both Weapon Dust and Armor Heartstone in the Dragon Ascension window
2. Review the displayed cost (Penya/Perin requirement)
3. Click "Absorb Dust" to confirm
4. Materials are consumed at a 1:1:1 ratio (1 Weapon Dust + 1 Armor Heartstone = 1 Dragon Power)

Detailed Cost Structure
[th]Dragon Power Range[/th][th]Level/Rank Equivalent[/th][th]Cost per Point[/th][th]Total Range Cost[/th]
0-60Level 1-60~16,667 Penya1,000,000 Penya
60-120Level 60-120~833,333 Penya50,000,000 Penya
120-160Level 120-150, Dragon Rank 0-10~125,000 Penya5 Perin
160-170Dragon Rank 10-201.5 Perin15 Perin
170-200Dragon Rank 20-50~833,333 Penya25 Perin
200-220Dragon Rank 50-702 Perin40 Perin
220-250Dragon Rank 70-100~1.67 Perin50 Perin
250-280Dragon Rank 100-130~1.83 Perin55 Perin
280-330Dragon Rank 130-1802 Perin100 Perin
330-350Dragon Rank 180-20012.5 Perin250 Perin
Exact costs are displayed in-game before confirmation
Rune System
Slot Requirements and Locations
[th]Slot[/th][th]Level Requirement[/th][th]Rune Type[/th][th]Dungeon Location[/th]
1Level 60GatekeeperGatekeeper's Sanctum
2Level 120AbyssalAbyssal Depths
3Dragon Rank 10StormStorm's Eye
4Dragon Rank 25VerdantVerdant Grove
5Dragon Rank 50PlagueheartPlagueheart Catacombs
6Dragon Rank 75ShadowShadow Realm
7Dragon Rank 100InfernoInferno Citadel
8Dragon Rank 125RiftstoneRiftstone Nexus
9Dragon Rank 150IvillisIvillis Observatory
10Dragon Rank 175KronoKrono's Timerift

Rune Acquisition
Direct Dungeon Access
Click any unlocked rune slot to receive an instant teleport to the corresponding dungeon.
Rune Quality Tiers
• Level 1: Common dungeon drops
• Level 2: Rare dungeon drops
• Level 3: Very rare drops + Dragon Ascension Treasure rewards
Consult the Item Wiki for specific rune effects and bonus values

Dragon Ascension Treasure
Premium loot source containing the rarest materials:
Contents:
• Dragon Ascension Giftbox (Dragon Cloak chance + Level 3 runes)
• Guaranteed high-tier rune materials
Key Sources:
• PvP reward crafting (Item Crafting menu)
• Donation shop purchases

Recommended Progression Strategy
Phase 1: Foundation (Levels 1-60)
1. Focus on reaching level 60 for automatic Veyrindor acquisition
2. OR complete Flaris Bangs gate quest early
3. Begin collecting dungeon equipment for dismantling
Phase 2: Set Preparation (Levels 60-105)
Priority: Obtain essential quest items
• Dragon Egg: Available in levels 15-60 set dungeons
• Hatched Egg: Found in levels 75-105 set dungeons (Level 90 dungeon recommended)
How to get the Hatched Egg: https://www.dragon-crusade.one/index.php/forum/guides/229-how-to-get-start-level-items-level-15-level-105
These items are crucial for Level 105 set quest completion

Phase 3: Dragon Power Development
1. Systematically dismantle dungeon equipment for materials
2. Begin Dragon Power absorption (target: 60+ for first rune slot)
3. Maintain steady material collection from dungeon runs
Phase 4: Rune Progression
1. Unlock and fill rune slots sequentially as level requirements are met
2. Start with Level 1 runes, upgrade when higher tiers become available
3. Prioritize Dragon Rank advancement for additional slots
Phase 5: Optimization
• Target: 350 Dragon Power + all Level 3 runes
• Collect multiple dragon companions from high-tier dungeons
• Acquire Dragon Cloak from treasure system
End-Game Objectives
Maximum Power Configuration:
• 350 Dragon Power (maximum damage/defense bonuses)
• 10 rune slots filled with Level 3 runes
• Dragon Cloak equipped
• Multiple dragon companions available
Strategic Importance:
The Dragon Ascension system provides substantial power increases essential for:
• High-level dungeon content
• Dragon Rank progression
• End-game raid participation
This system represents a significant time investment but provides proportional power returns. Plan your progression carefully and utilize all available resources for optimal advancement.
PvP Balance Sheet
DANI 16.07.2025
[th]Class[/th]
[th]Full STA Damage (DMG EQ)[/th]
[th]Full STR/DEX/INT Damage (DMG EQ)[/th]
[th]Full STA HP (HP EQ)[/th]
[th]Full STA HP (DMG EQ)[/th]
[th]Full STR/DEX/INT HP (HP EQ)[/th]
[th]Full STR/DEX/INT HP (DMG EQ)[/th]
Crackshooter
183k ~ 232k
246k ~ 311k
555k
151.4k
324.5k
35.6k
Harlequin
402k hop
549k hop
533.4k
152.1k
320.7k
37.2k
Templar
165k ~ 208k
202k ~ 252k
840.5k
202k
548k
48.3k
Slayer
211k ~ 459k
252k ~ 558k
591.5k
139.9k
381.9k
32.8k
Force Master ASAL
600k
911k
698.2k
190.7k
450.6k
48.1k
Force Master 1o1
188k ~ 238k
238k ~ 299k
698.2k
165.5k
450.6k
39k
Seraph
193k ~ 235k
242k ~ 306k
708.1k
175.7k
436.7k
41.4k
Mentalist
336k Rake / 216k Bomb / 160k Scream
447k Rake / 273k Bomb / 208k Scream
565.9k
142.9k
365.3k
34.9k
Arcanist
216k Void / 111k Bubble / 88k Eva
294k Void / 147k Bubble / 117k Eva
586.3k
163.7k
378.5k
40.1k
PvP Balance Test Conditions Updated
Base Equipment: DR40 Equipment (HP & DMG Gear)
═══ HP Equipment Test ═══
Jewelry:
- Ultimate Unique Tank Jewelry Set
- Shiny HP Necklace
Awakenings & Cards:
- Weapons & Armors: Ultimate Earth & Ultimate Volcano Cards
- Weapons, Shields, Helm, Suit & Pet: +42 STA Awakening
- Boots: +500 HP Awakening
Fashion & Cloak:
- Ultra Destructive Fashion Set (+7 STA on all parts)
- Cloak of Bravery (+7 STA Awakening)
Buff Pet:
- Soccerball Angel Buff Pet
- Appropriate STA and HP% Beads
Buffs:
- Dragon Sooth Buff +20
═══ Damage Equipment Test ═══
Jewelry:
- Class-specific Ultimate Jewelry Set (Strange Hunter's, Scary's, Dark Silent's)
- Shiny Attack Necklace
- ASAL Test: Shiny MP Necklace
Awakenings & Cards:
- Weapons & Armors: Class-specific Cards
Crit Damage-based Classes:
- Helm: +42 STR/DEX Awakening
- Weapons, Shields, Suits, Boots, Gauntlets & Pet: 28% Crit Damage Awakening
- Gauntlets: +250 Attack Power Awakening
Harlequin:
- +42 STR Awakening on all set parts, weapon, and pet (for max damage with "Penya Strike")
Forcemaster:
- Crit Damage Build: Standard Crit Setup
- ASAL Build: +800 MP Awakening on all set parts, weapon, shield, and pet
Magic Classes:
- Weapon, Shield, Helm, Suit, Gauntlets & Pet: +42 INT Awakening
- Gauntlets: +250 Attack Power Awakening
Fashion & Cloak:
- Class-specific Ultra Fashion Set with appropriate awakenings
- Cloaks:
- Collector Double Dragon Cloak (for Damage Tests)
- Cloak of Bravery (for ASAL Test)
Buff Pet:
- Soccerball Angel Buff Pet
- Class-specific Beads for each class
═══ General Test Conditions ═══
Furniture:
- Active Heart Furniture Set
- Active Guild Furniture (2000 Donate Points Box from the Donate Shop)
Couple System:
- Couple Level 21 active
Power-Ups:
- Grilled Eel
- Ginger Bread
- Upcut Stone
- Letter Letter Letter
- FITA
- Refresher Hold
Level 150 PvP Balance
[th]Class[/th]
[th]Full STA HP[/th]
[th]Full STA DMG[/th]
[th]EQ HP[/th]
[th]EQ DMG[/th]
[th]Normal DMG[/th]
[th]High Crit DMG[/th]
[th]Special Abilities[/th]
Templar
529k
190.1k
283.6k
49k
-
-
-
Seraph
468.7k
168k
257k
37.9k
-
-
-
Force Master (Assist)
440k
174k
251k
35k
260k
480k
-
Force Master (1v1)
440k
156k
251k
33k
89k
107k
-
Slayer
389k
132k
229.8k
30.8k
123k
202k
-
Arcanist
373k
195k
203k
43k
-
-
Void: 122k/200k | Javelin: 60k/90k | Eva: 53k/79k
Mentalist
357k
134.4k
203k
31k
-
-
Rake: 130k/225k | Bomb: 88k/130k | Scream: 66k/110k
Harlequin
351k
186.6k
179.4k
57k
-
-
HOP: 200k/280k
Crackshooter
333k
160k
177k
37k
129k
161k
-
EQUIPMENT SETUP (Level 130 Balance)
- CS Set with 7 Awakes
- 6x 100 DPS Donate Store Furniture
- 13579 Pet Buff Pet Panda Beads + Dragon Chip Beads
- 7% Cards & A Cards Champions Jewelry +20
- Tramnuk Kalgas + Dryad Sets
- Behemoth/Bloody Weapon
- Dragon Cloak Level 4
AWAKE STATS
- 25 STR/INT/DEX/STA
- 19% CD
- 190 Attack
- 500 max HP
Vote Treasure Guide | Item Bundles
DANI 30.06.2025

QUICK START - What You Need to Know
Main Benefits:
- Get FREE premium items by voting daily
- Save up to 50% on treasure bundles (normally cost full price)
Simple Steps to Get Rewards:
- Vote Daily → Get 100 points per vote (up to 3 votes/day)
- Collect Points → Reach 700/1400/2400 points for boxes
- Buy Your Box → Use points in vote shop
- Open Box → Get free items + discount key
- Use Discount Key → Save money on treasure bundle
HOW TO VOTE (Step-by-Step)
Step 1: Login to Website
- Go to: Dragon Crusade Login
- Login with your account
Step 2: Vote Process
- Click the "VOTE" button on website
- Complete the captcha on GTTop100 website
- Click "Vote for Dragon Crusade"
- Receive 100 vote points instantly
Step 3: Repeat Daily
- You can vote up to 3 times per day
- Check countdown timer on GTTop100 for next vote
- Keep voting consecutively - missing a day resets progress!
REWARD BOXES EXPLAINED
Basic Vote Treasure Box
- Cost: 700 Vote Points (7 days of voting)
- Contains: Free items + 10% Discount Key
- Best for: Casual players who vote occasionally
Advanced Vote Treasure Box
- Cost: 1400 Vote Points (14 days of voting)
- Contains: More free items + 25% Discount Key
- Best for: Regular players who vote consistently
Special Vote Treasure Box
- Cost: 2400 Vote Points (24 days of voting)
- Contains: Best free items + 50% Discount Key + Season Pass
- Best for: Dedicated players - BEST VALUE!
TREASURE BUNDLE SYSTEM
What's Inside ALL Treasure Bundles:
- Season Pass
- Lifetime Premium
- Collector Booster High
- Unlock Inventory Chest
Discount Keys Cost:
- 10% Discount Key: 5400 Donate Coins (saves you 600 coins)
- 25% Discount Key: 4500 Donate Coins (saves you 1500 coins)
- 50% Discount Key: 3000 Donate Coins (saves you 3000 coins)
Always aim for the Special Vote Box! The 50% discount key saves you the most money - you get the same items for HALF the price!

⏰ TIMELINE & STRATEGY
Best Strategy:
- Start voting NOW - Don't wait!
- Vote 3 times daily to maximize points
- Aim for Special Vote Box (2400 points = 24 days)
- Buy the 50% discount key for maximum savings
Time Calculation:
- Basic Box: 7 days minimum (if voting 3x daily)
- Advanced Box: 14 days minimum
- Special Box: 24 days minimum
DETAILED REWARDS BREAKDOWN
Spoiler
Free Items You Get:
- Dragon Cloak Level 3
- Beginner Warrior Set (30-day temporary)
- Dragon Ball 1x
- Dragonite Ore 50x
- Scroll of Acquisition (High) 1x
- Experience scrolls and power items
- FITA pieces 5x each
- Various consumables
Plus: 10% Discount Key for Treasure Bundle
Spoiler
Everything from Basic Box PLUS:
- Dragon Cloak Level 4 (upgraded)
- Dragon Ball 2x (doubled)
- Dragonite Ore 150x (tripled)
- More experience scrolls and items
- Lucky Panda 3x
- Mysterious Purple Crystal 5x
- Dark Rartesia Ticket
Plus: 25% Discount Key for Treasure Bundle
Spoiler
Everything from previous boxes PLUS:
- Season Pass (included free!)
- Dragon Cloak Level 5 (highest level)
- Dragon Ball 3x + bonus Dragon Balls
- Dragonite Ore 250x
- Cybertruck mount
- Premium food items (Grilled Eel, etc.)
- Gold treasure keys
- Anarchy Chips
- Many more premium items
Plus: 50% Discount Key for Treasure Bundle
LIFETIME PREMIUM GIVEAWAY
- 3 random participants will win Lifetime Premium
- Automatic entry by participating in voting event
- Winners announced during Season 12 launch (December 27th)
- No extra steps needed - just vote and you're entered!
⚠️ IMPORTANT REMINDERS
✅ DO:
- Vote every single day consecutively
- Aim for the Special Vote Box (best value)
- Start voting as soon as possible
- Use the 50% discount key for maximum savings
❌ DON'T:
- Buy lower-tier boxes if you can wait for Special
- Forget that Beginner Warrior Set expires after 30 days
- Wait until the last minute to start voting
QUICK LINKS
- Vote Here: Dragon Crusade Login
Vote daily for 24 days, get the Special Vote Box, use the 50% discount key, and save tons of money while getting amazing rewards + a chance at Lifetime Premium!
Event details subject to change. Dragon Crusade reserves the right to modify event parameters as needed.
Reborn Dragon | Rebirth Guide
DANI 16.04.2025

Shenlong Guardian Companion - Complete Guide
Introduction
The Shenlong Guardian Companion system allows players who have reached Dragon Rank 200 to continue progressing through a companion that levels independently, absorbs weapons for stat bonuses, and can be reborn to increase its potential.
Getting Started
- Access the System: Open via Start → Character → Reborn Dragon
- Prerequisites: You must be at Dragon Rank 200 and have the Shenlong buff active
- Initial State: Your companion starts at Level 1 while your character remains at DR 200
Leveling Your Companion
- Your companion gains XP as you defeat monsters
- Progress from Level 1-150, then Rank 1-200
- Weekly level caps apply - new content unlocks each week
- Check the UI for your current level/rank and XP progress
Weapon Absorption System
Basic Mechanics
- Absorb weapons to gain their stats permanently
- Absorption is partial per attempt - multiple absorptions of the same weapon are needed to reach 100%
- Absorption percentage is influenced by the weapon's reroll stats
- Each absorption requires a matching Mana Stone
Requirements
- Weapons must be the same level or lower than your companion
- Only class-appropriate weapons can be absorbed
- You need the correct Mana Stone for the slot you're using
Steps to Absorb a Weapon
[list=1]
- Slot 1: Mana Stone Blue
- Slot 2: Mana Stone Green (unlocked after first rebirth)
- Slot 3: Mana Stone Purple (unlocked after second rebirth)
What Gets Absorbed
- Base weapon stats (min/max attack, additional stats)
- Stats are applied proportionally to the absorption percentage
- Not Absorbed: Diamonds, jewels, weapon upgrades, or other added modifiers
Rebirth System
- Rebirth resets your companion's level/rank but preserves previous absorptions
- Each rebirth unlocks a new weapon absorption slot (maximum 3 slots)
- Requirements increase with each rebirth:
- First rebirth: 1 Cup of Reincarnation
- Second rebirth: 2 Cups of Reincarnation
- Third rebirth: 3 Cups of Reincarnation
- First rebirth: 1 Cup of Reincarnation
Special Notes
- You must have your Shenlong buff active to benefit from absorbed weapon stats
- Hover over your companion buff icon to see your absorption stats and percentages
- You can replace an absorbed weapon by absorbing a different weapon in the same slot
- Higher rank weapons generally require more Mana Stones for absorption
Tips
- Focus on absorbing weapons with stats that complement your build
- Prioritize weapons with good reroll values to increase absorption percentages
- Save Cups of Reincarnation for rebirth - don't use them for other purposes
- Complete the full absorption (100%) of a weapon before attempting rebirth
Feel free to ask any questions about the Shenlong Guardian Companion system in the comments below!
Free Donate Coins Guide
DANI 25.06.2024

C24 Bankkonto Eröffnen
Verdiene Donate Coins im Wert von 50€, indem du folgende einfache Schritte befolgst. Wähle eine der beiden unten aufgeführten Optionen, um zu starten:
Option 1: C24 Bankkonto
[list=1]
- Screenshot der Transaktion über 30€.
- Dein Vor- und Nachname.
- Deine E-Mail-Adresse.
- Dein Charaktername im Spiel.
Sobald wir deine Transaktion und den erfolgreichen Affiliate-Prozess verifiziert haben, erhältst du Donate Coins im Wert von 50€!

Option 2: Scalable Capital Broker
[list=1]
- Screenshot der Überweisung von 30€.
- Dein Vor- und Nachname.
- Deine E-Mail-Adresse.
- Dein Charaktername im Spiel.
Nach der Bestätigung deiner Angaben und erfolgreicher Affiliate-Verifizierung schreiben wir deinem Konto Donate Coins im Wert von 50€ gut!
Unlock the opportunity to earn Donate Coins worth €50 by following these simple steps. Choose one of the two options below to begin:
Option 1: C24 Bank Account
[list=1]
- Screenshot of the €30 transaction.
- Your first and last name.
- Your email address.
- Your character name in-game.
Once we verify your transaction and the affiliate process is successful, you will receive Donate Coins worth €50!
Option 2: Scalable Capital Broker
[list=1]
- Screenshot of the €30 transfer.
- Your first and last name.
- Your email address.
- Your character name in-game.
After confirming your details and successful affiliate verification, we will credit your account with Donate Coins worth €50!

Enhance your gaming experience by earning Donate Coins. The amount you earn is equivalent to your investment (e.g., invest $100, receive Donate Coins worth $100). Follow these steps using the eToro platform:
Option 3: eToro Trading Platform
[list=1]
- Screenshot showing that referrals have generated at least $10 in commissions.
- Your first and last name.
- Your email address.
- Your character name in-game.
After confirming the details and successful affiliate verification, you will receive Donate Coins equivalent to your investment!
Verbessere dein Spielerlebnis, indem du Donate Coins verdienst. Die Menge der erhaltenen Coins entspricht deiner Investition (z.B. investiere $100, erhalte Donate Coins im Wert von $100). Befolge diese Schritte unter Verwendung der eToro Plattform:
Option 3: eToro Handelsplattform
[list=1]
- Screenshot, der zeigt, dass Empfehlungen mindestens $10 an Provisionen generiert haben.
- Dein Vor- und Nachname.
- Deine E-Mail-Adresse.
- Dein Charaktername im Spiel.
Nach der Bestätigung der Details und erfolgreicher Affiliate-Verifizierung erhältst du Donate Coins entsprechend deiner Investition!
Password Reset Guide
DANI 29.11.2023
[ol]
[li]Enter your email als username on the website.[/li]
[li]Press the login button.(This will trigger a pw reset email)[/li]
[li]Wait for the email and press the link in the email.[/li]
[li]Check Spam Folder[/li]
[/ol]
Anleitung zum Zurücksetzen des Passworts
[ol]
[li]Geben Sie Ihre E-Mail und Ihren Benutzernamen auf der Website ein.[/li]
[li]Drücken Sie die Login-Taste (dadurch wird eine E-Mail zum Zurücksetzen des Passworts versendet).[/li]
[li]Warten Sie auf die E-Mail und klicken Sie auf den Link in der E-Mail[/li]
[li]Spam Ordner Prüfen[/li]
[/ol]

ExitLag Tutorial
Jesline 26.01.2023
• ExitLag is a proprietary technology that optimizes data routing by instantaneously mapping out various routes and sending the packet through the optimal one! If one path becomes unstable, the others kick in keeping the game connection unphased.
How to register & use it?
Step 1: Go to https://www.exitlag.com/refer/9102161 .
Step 2: Click get ExitLag or pricing on the top of the page and choose your plan.
Step 3: Register an account, log in and choose your payment method.
Step 4: Download the Exitlag application and log in to your account.
Step 5: Once you open the application, search for private and choose your game region near the game's host then click apply routes.
Step 6: Check if it's activated.
Step 7: Go to Dragon Crusade files and open the Neuz.exe file to open a client. Once you open a client there should be a notification on the lower right of your screen.
Step 8: Log in to your game account and to check if it's working, go to the ExitLag application and look for connected applications.
And it's done! You can now enjoy a lag-free game!
Island Expedition Guide
Jesline 27.12.2022
This map is where you can upgrade your Dragon CS Set. You will need to complete the different quests to obtain the "Blue Star Dragonball" which you will be exchanging to get your Ultra Dragon CS Set
Step 1: Teleport on Island Expedition & get the quest on NPC Tortuga - Expedition Quest.
1st: Get Ship Expedition I quest
For Ship Expedition 1
- You need to meet Marino - Harbour Master
- Get the quest from NPC Captain Loro
After you finish the quest, go to NPC Tortuga - Expedition Quest again and get the Ship Dungeon (Expedition Quest) > Talk to Marino Harbour Master > Submit your quest, Captain Loro and you will be teleported on a map and you will need to clear.
For Save the Island
- Defeat Mecha Mangrove & Cavernous Colossal on the Island Expedition map & Find NPC Island General
For Undersea Expedition
- Teleport on Kraken Expedition & enter the portal.
- Kill the mini-bosses to respawn Leviathan.
For Observatory Expedition
- Teleport on Observatory Expedition & enter the portal.
- Kill pre-boss "Seagull Sneaker" to respawn "Void Knight"
Important Notes:
- Make sure to bring enough healing items and equipment for each quest.
- It is recommended to have a full party to complete the quests more efficiently.
- Some quests may require multiple attempts to complete. Don't give up!
- The Blue Star Dragonball can be exchanged for the Ultra Dragon CS Set at NPC Tortuga - Expedition Quest.
Dust Cave Dungeon Guide
Jesline 27.12.2022
This dungeon is one of the most important that needs to be entered every day. You can farm in here the scroll you will need to upgrade your end-game accessories. The required level on this dungeon is Dragon Rank 5 and above and you will also need white crushers that you can obtain on the Dragon Rank monsters.
Step 1: Once you enter the dungeon, get the quest first.
Step 2: Find the right eggs which contain the monster "Garuda Frog". Here's the guide which contains the monster along the way.
Note: There are other eggs that contain "Garuda Frog". You will be needing 9 White Crushers on each egg.
Step 3: Kill "Ugly Parasit" at the early stage of the map.
Step 4: Kill "[Guard] Tree of Aldar" at the mid-stage of the map.
Step 5: Kill "[Guard] Baldo Lizard" at the near end of the map. Once you kill it, it will respawn another 4 Baldo Lizards that you need to kill to respawn the Final Boss "Retjack"
Step 6: Find the secret passageway near the Baldo Lizard location. You need to double-click the door to open it then submit your quest on the NPC. Once you submit the quest you will get 25pcs of Super scroll of AProtect.
Step 7: Kill "Retjack" (optional). This final boss drops the ultimate card piece & Dust Cave(Gold Key).
Other things to do inside the dungeon:
You can open the treasures around the Retjack area using your Dust Cave silver & gold key.
Treasure Box System
Panda 27.08.2021
Bronze, Silver, Gold Secret Treasure Keys -> dropable in dungeons
Secret Treasure Box I -> dropable up to monster level 1-120
Secret Treasure Box II -> dropable up to monster level 120-150
Secret Treasure Box III -> dropable up to monster level Dragon Rank
Ankou Treasure Box -> dropable at Ankou dungeon
Bronze, Silver, Gold Ankou Treasure Key -> dropable at Ankou dungeon
Secret Treasure Box I
Lasagne
Grab bag (Pet Accessories)
Grab bag (Upgrade Scroll)
Grilled Eel
Bullhamster
Refresher Hold
Vital Drink X
Activision
UpcutStone
Letter
Letter
Letter
Fita Cookie (F)
Fita Cookie (I)
Fita Cookie (T)
Fita Cookie (A)
Super Star Candy
Christmas Cake
Love Chocolate
Purple Cotton Candy
Blue Cotton Candy
Green Cotton Candy
Red Cotton Candy
Sky-Blue Cotton Candy
Pink Cotton Candy
Yellow Cotton Candy
White Cotton Candy
Gray Cotton Candy
Orange Cotton Candy
Pride of Victory
Dragon Crystal
Scroll of SProtect
Scroll of GProtect
Scroll of AProtect
Scroll of XProtect
Scroll of Smelting
Scroll of Amplification ES (S)
Offline Collector Booster [Low]
Rem Set (F)
Ram Set (F)
Yoshino Set (F)
Asuna Alfeim Set (F)
Albedo Set (F)
Mikasa Set (F)
Inuyasha Set (M)
Tsukiyama Set (M)
Nishiki Set (M)
Amorous Rabbit Cloak
Ice Elemental Monster Cloak
Saber Shinigami Cloak
Royal Rabbit (black/white) (Mount)
Capricorn (Mount)
Unicorn Horse (Mount)
Pink Rabbit (Mount)
Orange Rabbit (Mount)
Felstalker (Mount)
Undead Demon (Mount/Fly)
Premium (1 day)
Premium (14 days)
Secret Treasure Box V
Remantis Laccotte
Upcut Stone
Letter
Letter
Letter
Fita Cookie (F)
Fita Cookie (I)
Fita Cookie (T)
Fita Cookie (A)
White Crusher
Super Star Candy
Super Moonstone
Christmas Cake
Love Chocolate
Blue Macaron
Pink Macaron
Green Macaron
Red Macaron
Gold Macaron
Pride of Victory
Offline Collector Booster [Medium]
Scroll of Experience (Pet)
Scroll of Amplification ES (S)
Gold Battery
Lucky Box Panda Beads (x1)
Megumin Set (F)
Emilia Set (F)
Darkness Set (F)
Aqua Set (F)
Yamai Set (F)
Nezuko Set (F)
Kishou Set (M)
Meliodas Set (M)
Noro Set (M)
Desert Dragon Wing Cloak
Black Dragon Wing Cloak
Traditional Japanese Umbrella Cloak
Starguardian Cloak
Ice Dragon (Mount/Fly)
Onyxia Dragon (Mount/Fly)
Nightbane Dragon (Mount/Fly)
Royal Rabbit (grey) (Mount)
Phoenix (Mount/Fly)
Baby Nightmare Dragon (Mount/Fly)
Premium (14 days)
Premium (28 days)
Secret Treasure Box II
Remantis Laccotte
Weapon Dust
Diamond
White Crusher
Mysterious Blue Crystal
Mysterious Grey Crystal
Mysterious Red Crystal
Mysterious Purple Crystal
Mysterious Green Crystal
Super Star Candy
Super Moonstone
Christmas Cake
Love Chocolate
Blue Macaron
Pink Macaron
Green Macaron
Red Macaron
Gold Macaron
Pride of Victory
Lucky Box Panda Beads (x1)
Common Guild House Sofa
Common Guild House Bookshelf
Common Guild House End Table
Common Guild House Chair
Common Guild House Table
Common Guild House Flooring
Common Guild House Wallpaper
Lovely Furniture Lucky Box
Scroll of Experience ( Weapon Level )
Scroll of Experience ( Dragon Rank )
Scroll of Experience (Pet)
Scroll of Amplification ES (S)
Anarchy Chip
Offline Collector Booster [High]
Lucky Mount Chest
Lucky CS Set Chest (M)
Lucky CS Set Chest (F)
Perin
Lucky Donate Treasure
Gold Battery
Scroll of Dragon Rank Down ( B )
Scroll of Dragon Rank Down ( A )
Premium CS Set Treasure
BadSoul Hat
Chimera Hat
Clipping Bear Hat
Clipping Dog Hat
Cold Snowman Hat
ConfirmedCat Hat
CutePanda Hat
Dizzy Hat
Drabbit Hat
Dracula Hat
Fishy Hat
FoxyHatscarf Hat
Glibboy Hat
Island Hat
Allister Mask
Antares Mask
Ayarella Mask
Blue Eyes Dragon Mask
Bombchu Mask Mask
Crazy Devil Mask
DrWright Mask
Red Sakura Wing Mask
Pure Gold Wing Mask
Greatful Wing Mask
Goddess Wing Mask
ChimeraX Wing Mask
Calypso Wing Mask
Diabolic Wing Mask
Hellsing Wing Mask
Diamond-Tiger (Mount)
Magmatiger (Mount)
Frostwolf (Mount)
Dark-Saber (Mount)
Ice-Hippogryph (Mount)
Lavahorse (Mount)
Weapon Level-Up (250-300)
Baby Pikachu
Premium Lifetime
Ankou Treasure Box
Remantis Laccotte
Mysterious Blue Crystal
Mysterious Grey Crystal
Mysterious Red Crystal
Mysterious Purple Crystal
Mysterious Green Crystal
Smiling Gray Sun
Smiling Red Sun
Smiling Yellow Sun
Super Star Candy
Christmas Cake
Love Chocolate
Blue Macaron
Pink Macaron
Green Macaron
Red Macaron
Gold Macaron
Pride of Victory
Lovely Furniture Lucky Box
Scroll of Experience ( Weapon Level )
Scroll of Experience ( Dragon Rank )
Scroll of Experience (Pet)
Scroll of Amplification ES (S)
Gold Battery
All Behemoth Weapons
How to get Start level items Level 15 - Level 105
CSharp 22.04.2021
[center]This guide is about how you can get items as quickly as possible.
[center]Example: Mercenaries. If you get Mercenary Equipment + Weapons / All this to +6.
[center]The dungeons are freely accessible to everyone, so you don't need a group.
[center]And of course you also get start powerups. See pictures

[center]Level 15 dungeon near Bangs
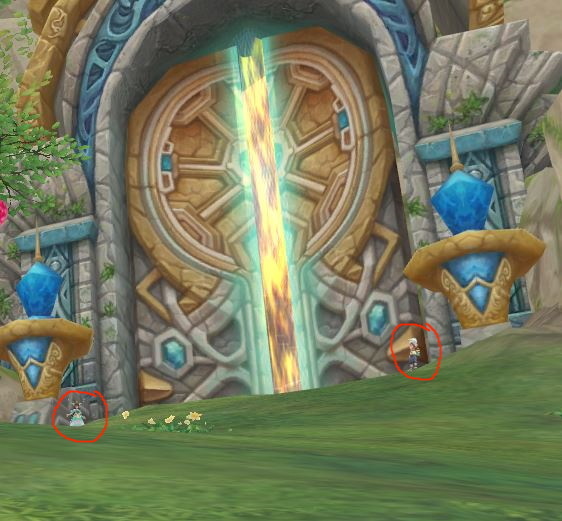


[center]Level 30 dungeon near DumbBull


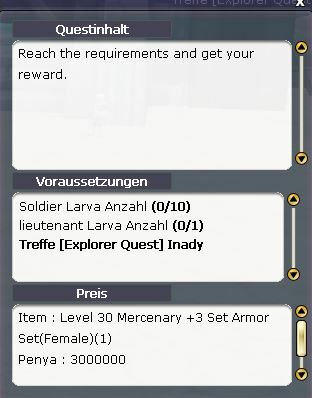
[center]Level 45 dungeon near Basque
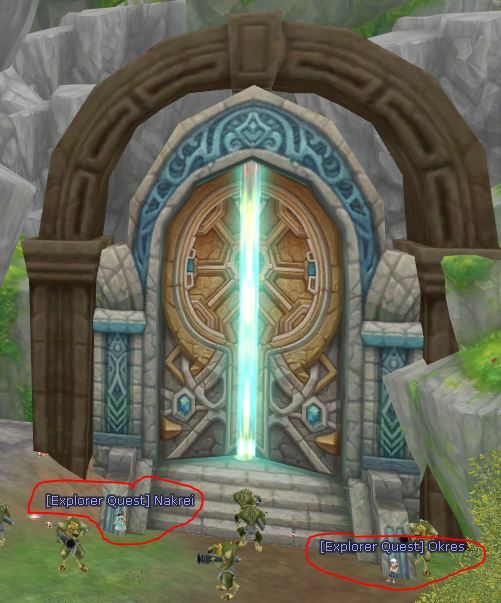


[center]Level 60 dungeon near Crane Machinery


[center]Level 75 dungeon near Hoppre


[center]Level 90 dungeon near Antiquery / Horrible Rangda


[center]Level 105 dungeon near Popcrank


How to be a Dragon Crusade Streamer?
Jesline 01.01.2021
• You need to have a Facebook page
• You need to have at least 200 followers on your page
• Contact DANI or GM Jesline on Discord and provide your streaming page
For Twitch Streamers
• You need to have at least 100 followers
• Contact DANI or GM Jesline on Discord and provide your twitch channel
For YouTube Streamers
• You need to have at least 100 subscribers
• Contact DANI or GM Jesline on Discord and provide your YouTube channel
What are your tasks as a Streamer?
• Share “Dragon Crusade” page and server information every time you go live
• Promote the server using different platforms (such as but not limited to Facebook pages, Facebook groups and etc.)
What are the benefits of a Streamer?
• The giveaways in your stream will be provided by the server
• A special reward will be given to streamers who will meet the criteria below
Tier
Rookie Streamer
Veteran Streamer
Elite Streamer
Pro Streamer
Master Streamer
Legendary Streamer
Total streaming hours per week
20 hrs
25 hrs
30 hrs
35 hrs
40 hrs
45 hrs +
Total no. of views per week
1,000 - 2,000
2,100 - 4,000
4,100 - 6000
6,100 - 8000
8,100 - 10,000
10,100 +
Rewards
10k Dragon Chips + 100 Fashion Coins
15k Dragon Chips + 200 Fashion Coins
20k Dragon Chips + 300 Fashion Coins
30k Dragon Chips + 500 Fashion Coins
40k Dragon Chips + 700 Fashion Coins
50k Dragon Chips + 1000 Fashion Coins
Streamer Guidelines
• Post on “Streams and Videos” section on Discord whenever you go live so we can share your stream
• You will be given a chart where you can indicate the date, time and views of your stream that we will check.
• Here’s our default caption below that you will use on your livestream description
- Join Now: www.Dragon-Crusade.one
- Dragon Crusade Filipino Community: https://www.facebook.com/groups/630641864213447
- Discord Link: https://discordapp.com/invite/cXsVX9u
Server Features
⚔ 25 • 25 • 25 Server Rates
⚔ Low - Mid Rate Server
⚔ 500 + Daily Player Online
⚔ Daily Quest
⚔ Active Community
⚔ Hybrid Mounts
⚔ Classic and Custom Dungeons
⚔ Balance PvP
⚔ World Boss System
⚔ Achievement System
⚔ Dragon Rank System
⚔ Competitive Secret Room
Item Preview / Model Preview Guide
Graphicscore 09.07.2020

With the Item Preview / Model Preview System you can take a look at all kinds of ingame items before buying / farming them.
The system available in various windows including but not limited to
[ul]
[li]Inventory (ALT - Left Click to show preview)[/li]
[li]Item Wiki[/li]
[li]Shops / Vendors[/li]
[li]Fashion Store[/li]
[/ul]
[ul]
[li]Weapons[/li]
[li]Clothing[/li]
[li]Boxes / Sets[/li]
[li]Mounts[/li]
[li]Pets[/li]
[li]Wings[/li]
[/ul]
[ul]
[li]Left-Click + Drag Up / Down to move the Item Up and Down[/li]
[li]Use Mousewheel to zoom in / out[/li]
[/ul]
Item Finder / Item Browser Guide
Graphicscore 09.07.2020
The Item Finder is a system that lists all quest rewards and player/offline vendor shops.
You can filter the result with the help of various settings.
On the left side you can set filters for item type, minimum level, currency (for vendors), price etc.
There is also an text field available (at the top) to search for the Item Name, NPC quest giver or player name (for vendors)
In the top center you also have an option to either show only quests, only vendors or both.
If you double click an item on the list a marker will appear over your head indicating where the quest giver or vendor is located.
If you would like to remove the marker you can click on the "Remove Marker" button on the bottom left.
If you're a premium user you also have the option to directly buy the item from a vendor when right clicking the item in the list.
Index of Guides and Tutorials
Graphicscore 09.07.2020
You can click on each entry to get more information about this system
[ul]
[li]Login Rewards[/li]
[li]CS-Set Quests[/li]
[li]Winter Crusade Quest[/li]
[li]Dragon Cloak Quest[/li]
[li]Weapon Level[/li]
[li]How to get Start level items Level 15 - Level 105[/li]
[/ul]
[ul]
[li]Season 2020 Quickstart Guide[/li]
[li]Leveling Guide[/li]
[li]How to get Start level items Level 15 - Level 105[/li]
[/ul]
[ul]
[li]Anarchy Events[/li]
[li]Lord & Player Events[/li]
[li]Server Buffs[/li]
[li]Player/Lord Events[/li]
[/ul]
[ul]
[li]Weapon Wiki[/li]
[li]Equipment Wiki[/li]
[/ul]
[ul]
[li]Guild Buffs[/li]
[li]Monster Buffs[/li]
[li]Kill Counter Shop[/li]
[li]In-Game Titles[/li]
[li]Rainbow Race[/li]
[li]How to gain Penya[/li]
[li]Pet GuidePet Guide[/li]
[li]Collector Guide[/li]
[/ul]
[ul]
[li]Autoshout[/li]
[li]Item Finder / Item Browser[/li]
[li]Item Preview / Model Preview[/li]
[/ul]
EXP Event Guide
Jesline 07.07.2020
This guide will show you different kinds of EXP Events feature we have in-game. As you may know, we have 3 different EXP Events that we can do in-game for the community that can help us in leveling faster.
1. Anarchy Events
A type of event that can boost your EXP for a cheap cost but with a lower percentage of EXP. This event not only can trigger an EXP Boost but also can provide other events that can help you with leveling.
Start> Extra > Anarchy Event
• Powerful Acceleration = 10% Speed
• Enchanted Force = 15 All Stat
• Glorious Tank = 5% HP
• Enhancement Experience = 10% EXP (additional 5% more EXP for the one who will trigger it)
• Temporal Attack = 5% Increase Attack
• Temporal Hitrate = 10% Hitrate
• Bonus Collector Timer = 20% Collector Time Reduction
• Powerful Pet = 20% Experience of the Pet
Note: The money for anarchy buffs will be automatically donated to the lord's bank.
2. Lord & Player Event
A type of event that both have almost the same power but different advantage to each other. Lord Event where you need to be the "Lord" to trigger a Lord EXP Event. As a Lord, you can trigger an event anytime you want from 5% to 50% EXP Event but also the cost will depend on how much percent you will trigger and you also have a "Lord Skill" that can provide EXP, damage and stats while Player Event is where normal players can trigger a "Lord Event" too but only on fixed times (get the link to player event time below). Player Event will also cost the one who triggers 20% of its own money and 80% from the Lord's Bank while Lord Event costs 100% of Lord's Bank money.
Here's the link for the player event time: https://dragon-crusade.one/index.php/forum/guides/132-player-event-system
Note: Always check first the Lord"s Bank before triggering an event.
3. Server Buff
This is the highest way of boosting EXP but also you need a lot of money to do it. Like Anarchy event, this Server Buff not only provides EXP Event but also other events that can provide a big help on leveling.
Once you buy a Server Buff Coin, you can trigger it by opening the Server Buffs Window.
Start > Community > Server Buffs, after that just double click the Server Coin that you have in the window.
• Stat Coin = 10 All Stat
• Tank Coin = 15% HP
• Support Coin = 15% Cast Time
• Penya Coin = 10% Penya Rate
• Destroyer Coin = 15% PVE Damage
• EXP Worldbuff Coin = 100% EXP
• Dragon Rank Coin = 2.0x Dragon Rank EXP
• Weapon Level Coin = 1.5x Weapon Level EXP Rate
Note: None of this EXP Event can be stacked or trigger at the same time, whenever there's a different EXP Event ongoing, other types of EXP Event will be disabled but when a certain event has only 10 minutes left before it expires you can trigger a different type of EXP Event.
Beginner Guide Season 2020
gamstershot 03.07.2020
Spoiler
Hey Leute, ich möchte euch zum Start der Season etwas helfen und euch deshalb erklären, wie ich als Spieler hier starten würde.Ich habe hier lange Zeit aktiv gespielt und denke als kleine Starthilfe kann das echt interessant für euch sein.
Zu aller erst, sucht euch Leute, Mitspieler oder eine Gilde, mit der Ihr hier zusammen spielen wollt, zusammen macht es doch einfach viel mehr spaß. Nutzt hierzu doch Discord, Facebook, oder fragt eure Freunde, ob sie ebenfalls hier spielen wollen und macht euch gemeinsam bereit für das Abenteuer, dass am 10 July startet.
Habt ihr das erst einmal geschafft, ist euer erstes Hauptziel meiner meinung nach lvl 120. Auf dem Weg dahin nehmt ihr natürlich alle mit, was ihr könnt, das heißt: Tramnuk + Urpresia ( lvl 80 ) Herneos ( lvl 100 ) and Sanpres ( lvl 110 ) werden die ersten Dungeons sein, die ihr auf dem Weg zu lvl 120 mitnehmen solltet. Es reicht, die täglich möglichen Runs ein mal zu machen. Die Waffen benötigt ihr zum einen für Gearscore, zum andern aber auch zum Verkauf oder handeln mit anderen Spielern.
Gearscore erhaltet ihr unter anderem auch vom Upgraden eures Sets, welches das lvl 105 Set zuerst sein sollte, oder vom Upgraden eurer Waffen, sowie einem höheren Waffenlevel. Euren Schmuck könnt ihr auch für Gearscore upgraden.
Habt ihr es nun auf lvl 120 geschafft, müsst ihr euren Gearscore auf das Level bringen, dass für die Red/Green/Blue Meteonyker benötigt wird. Diese 3 Drachen werden sehr hilfreich sein, da jeder diese Bloody Sets vom Red Meteonyker braucht, ebenfalls den +20 Schmuck from Green Meteonyker oder auch die Bloody Waffen vom Blue Meteonyker. Das wirft euren Gearscore Wert stark nach oben.
Vergesst hierbei aber nicht, dass auf dem Gesammten Weg richtung lvl 120 auch das farmen von Giants, das machen von Quests sowie das Daily Dungeon sehr hilfreich sind.
Nun seid ihr auch bereit zum einen Vampire Dungeon zu laufen. Wenn ihr das nicht wollt, dann bleibt ihr entweder ein paar Tage auf lvl 120, farmt auf der Farmwelt ( Dragon Island ) Penya / um euch etwas Geld anzusparen mit dem Verkauf von items die ihr nicht braucht, oder ihr macht euch auf den Weg, levelt weiter und bleibt bei 80-M das nächste mal stehen um Master Tramnuk ( 80-M ) zu laufen. Seit euch natürlich sicher, dass ihr auch den nötigen Gearscore erreicht. Welcher Gearscore für welchen Dungeon notwendig ist, das seht ihr im Teleporter Menü jeden Dungeons. Das solltet ihr definitiv tun, das euch das wirklich sehr stark machen wird. Die Waffen, aber auch die Schmuck-Sets sind sehr begehrt und auch sehr stark, ebenfalls benötigt ihr den Gearscore, für weitere höhere Dungeons. Es lohnt sich hierfür auch, mehrere Chars zu machen, die hier laufen können, da diese Drops hier auch für längere Zeit einen Wert haben werden.
Wie euer Weg ab hier weitergehen wird, das liegt nun bei euch. Ich hab euch hiermit eine kleine Hilfe gegeben, die ich selbst als Spieler auch so wahrnehmen würde und werde. Ich hab hier und da sicher auch mal ein paar Sachen vergessen oder bewusst nicht erwähnt, die auch noch irgendwo nützlich sein könnten, ein paar Erfahrungen in diesem Abenteuer sollt ihr aber auch selbst noch machen können.
Ich werde diese kleine Starthilfe in mehreren Sprachen posten, damit sich der ein oder andere in seiner Sprache etwas leichter tut. Seid mir hier aber bitte nicht böse, wenn manches komisch klingen sollte, ich übersetze das natürlich nicht selbst :)
Seit euch im klaren, auch kleine sachen können sehr nützlich für euch sein. Neben eurem normalen Spielen, könnt ihr ebenfalls auf dem Collector Feld stehen um Power Ups zu sammeln oder andere nüzliche Items, aber auch Shops mit Set Parts, Items vom Collector Feld, Drops von Dungeons/Bossen oder Giants bringen euch Penya, die ihr brauchen werdet.
Viel Erfolg und viel Spaß mit Dragon Crusade !
Maxxel
English
Spoiler
Hey guys, I want to give you a little help at the start of the season and explain to you how I would start here as a player.I've been playing here for a long time and I think as a little help to get started it could be really interesting for you.
First of all, find people, players or a guild you want to play with, it's much more fun together. Use Discord, Facebook, or ask your friends if they want to play here and get ready for the adventure that starts on July 10th.
Once you've done that, your first main goal is, in my opinion, lvl 120. On the way there, of course, you'll all take what you can, that is: Tramnuk + Urpresia ( lvl 80 ) Herneos ( lvl 100 ) and Sanpres ( lvl 110 ) will be the first dungeons you should take with you on your way to lvl 120. It is enough to do the daily possible runs once. You need the weapons for Gearscore, but also for selling or trading with other players.
Gearscore you will get from upgrading your set, which should be the lvl 105 set first, or from upgrading your weapons, as well as a higher weapon level. You can also upgrade your jewellery for Gearscore.
If you have made it to lvl 120, you need to bring your gearscore to the level required for the Red/Green/Blue Meteonyker. These 3 dragons will be very helpful, because everybody needs these Bloody Sets from Red Meteonyker, also the +20 Jewellery from Green Meteonyker or the Bloody Weapons from Blue Meteonyker. This will raise your Gearscore value a lot.
But don't forget that farming giants, doing quests and the Daily Dungeon are also very helpful on the whole way to lvl 120.
Now you are ready to run the Vampire Dungeon. If you don't want to do that, you can either stay a few days on lvl 120, farm on the farm world ( Dragon Island ) Penya / to save some money by selling items you don't need, or you can go on your way, level up and stop at 80-M the next time to run Master Tramnuk ( 80-M ). Be sure to reach the necessary gearscore. Which Gearscore is necessary for which dungeon you can see in the Teleporter Menu of each dungeon. You should definitely do that, that will make you really strong. The weapons, but also the jewellery sets are very popular and also very strong, you also need the gearscore for further higher dungeons. It is also worth making several chars that can run here, as these drops will be worth a lot of time here.
How your path will continue from here is up to you. I have given you a little help with this, which I would and will perceive as a player myself. I'm sure I forgot or deliberately didn't mention a few things here and there that could be useful somewhere, but you should still be able to make some experiences in this adventure yourself.
I will post this little jump start in several languages, so that the one or the other will have an easier time in his language. But please don't be angry with me if some of it sounds strange, of course I don't translate it myself :)
Since you know that even small things can be very useful for you. Besides your normal playing, you can also stand on the collector field to collect power ups or other useful items, but also shops with set parts, items from the collector field, drops from dungeons/bosses or giants will bring you Penya, which you will need.
Good luck and have fun with Dragon Crusade !
Maxxel
Filipino
Spoiler
Uy guys, nais kong matulungan ka nang kaunti sa simula ng panahon at sa gayon ay ipaliwanag kung paano ako magsisimula bilang isang manlalaro dito.Naglaro ako ng aktibo dito sa loob ng mahabang panahon at sa palagay ko maaari itong maging talagang kawili-wili para sa iyo bilang isang maliit na tulong sa pagsisimula.
Una sa lahat, maghanap ng mga tao, kasamahan sa koponan o isang guild na nais mong i-play dito, magkasama ito ay mas masaya. Gumamit ng Discord, Facebook, o tanungin ang iyong mga kaibigan kung nais din nilang maglaro dito at maghanda para sa pakikipagsapalaran na nagsisimula sa ika-10 ng Hulyo.
Kapag nagawa mo na iyon, ang una mong pangunahing layunin ay ang aking opinyon ayon sa lvl 120. Sa paraan na siyempre kukunin mo ang lahat na maaari mong gawin, iyon ay: Tramnuk + Urpresia (lvl 80) Herneos (lvl 100) at Sanpres (lvl) 110) ang magiging unang dungeon na dapat mong gawin sa iyong paglalakbay sa lvl 120. Ito ay sapat na upang gawin ang pang-araw-araw na tumatakbo nang isang beses. Kailangan mo ang mga sandata para sa Gearscore sa isang banda, ngunit para din sa pagbebenta o pakikipagkalakalan sa ibang mga manlalaro.
Magagamit din ang Gearcore mula sa pag-upgrade ng iyong set, na dapat na itakda ang lvl 105 set muna, o mula sa pag-upgrade ng iyong mga armas at isang mas mataas na antas ng armas. Maaari mo ring i-upgrade ang iyong alahas para sa Gearcore.
Kung ginawa mo na ito ngayon sa antas na 120, kailangan mong dalhin ang iyong Gearcore sa antas na kinakailangan para sa Red / Green / Blue Meteonykers. Ang mga 3 dragons na ito ay magiging kapaki-pakinabang, dahil kailangan ng lahat ng mga madugong Sets mula sa Red Meteonyker, din ang +20 na alahas mula sa Green Meteonyker o ang madugong armas mula sa Blue Meteonyker. Itinapon ang iyong halaga ng Gearcore nang mahigpit.
Ngunit huwag kalimutan na sa buong landas patungo sa lvl 120, ang mga higanteng magsasaka, paggawa ng mga pakikipagsapalaran at ang pang-araw-araw na piitan ay lubos na kapaki-pakinabang.
Ngayon handa ka na magpatakbo ng isang bartolina ng vampire. Kung hindi mo gusto iyon, pagkatapos ay manatili ka sa lvl 120 sa loob ng ilang araw, sakahan sa bukid ng bukid (Dragon Island) Penya / upang makatipid sa iyong sarili ng kaunting pera sa pamamagitan ng pagbebenta ng mga item na hindi mo kailangan, o pupunta ka, antas up at huminto sa 80-M sa susunod na oras upang patakbuhin ang Master Tramnuk (80-M). Siyempre sigurado ka na makamit mo rin ang kinakailangang gearscore. Maaari mong makita kung aling mga gearscore ang kinakailangan para sa kung aling mga piitan sa menu ng teleporter ng bawat piitan. Dapat mong gawin iyon, na talagang gagawa ka ng napakalakas. Ang mga armas, ngunit din ang mga hanay ng alahas ay napakapopular at napakalakas din, kailangan mo rin ang Gearcore para sa karagdagang mas mataas na mga piitan. Ito rin ay nagkakahalaga ng paggawa ng maraming mga chars na maaaring tumakbo dito, dahil ang mga patak na ito ay magiging halaga sa loob ng mahabang panahon.
Paano magpapatuloy ang iyong landas mula rito ay nasa iyo. Binigyan kita ng kaunting tulong, na maramdaman ko rin bilang isang manlalaro. Marahil nakalimutan ko o hindi ko nabanggit ang ilang mga bagay dito at maaari ding maging kapaki-pakinabang sa isang lugar, ngunit dapat mo ring makagawa ng ilang mga karanasan sa pakikipagsapalaran sa iyong sarili.
Ipo-post ko ang maliit na pagsisimula ng jump na ito sa maraming mga wika upang ang isa o ang isa ay maaaring gumawa ng isang maliit na mas madali sa kanyang wika. Ngunit mangyaring huwag magalit sa akin dito kung ang ilang mga bagay ay tila kakaiba, syempre hindi ko ito isalin sa aking sarili :)
Dahil malinaw ka, kahit na ang mga maliliit na bagay ay maaaring maging kapaki-pakinabang para sa iyo. Bilang karagdagan sa iyong normal na mga laro, maaari ka ring tumayo sa patlang ng kolektor upang mangolekta ng mga power up o iba pang mga kapaki-pakinabang na item, ngunit din ang mga tindahan na may mga set na bahagi, mga item mula sa patlang ng kolektor, bumaba mula sa mga dungeon / bosses o higante na magdadala sa iyo penya na kakailanganin mo .
Good luck at magsaya sa Dragon Crusade!
Maxxel
Leveling Guide
Jesline 15.06.2020
1. Buddy System
A leveling system where you can gain additional experience when you are together with 1 active player on your leveling zone.
Mechanics:
• Both players should be active in killing a monster on the same spot.
• Both players should be near or in the range of each other (we increase the range)
• You can level with up to 3 people together and can get up to 30% more EXP (each active player gives 15% more EXP)
2. Gapper/ Leech
A method where you use a gapper/leech to level with. This is good for those players who don't have an active partner to level and still want to gain more experience in leveling. This method will give all the experience on your leveling character because the partner is a gap and won't gain any experience.
Mechanics:
• You need level 1 char or any character that is a gap with your current level (it will be best if the character can fly or just use a "mount")
• Follow it with your leveling character.
3. Tanking
This method is good for those players who have already have high-level character or friends that can help them. This method will require you a tank and let your leveling character to kill all the monster.
Mechanics:
• High-level character (a big level gap on your current leveling character)
• Combination of #2 method where you need a gapper/leech to level with.
Note: Tanker should not be at the party.
4. Leeching Method
This method is basically for those players who support, don't have enough items or strong enough to level, and have friends or known players that can level with them. This method will only require you to follow the leveler.
Mechanics:
• You must have a maximum of 19 level gap on the leveler to get experience(e.g., A level 39 leveler and you as a level 20 leech)
Additional ways to level faster and get more experience:
a. Darkon & Khaldera Camp Quest - you need to get the quest from darkon or khaldera quest NPC and collect the quest item requirements and you will gain a big amount of experience.
b. Scroll of Amplification ES - A scroll that gives additional experience.
You can get it from the ff:
• Grab bag upgrade scrolls
• Red Chip Dealer
• Event Token Manager
• Vote Item Shop
c. Scroll of Experience (Dragon Rank) - A scroll that gives additional experience on Dragon Rank Level.
You can get it from the ff:
• Lucky Chest Power-Up (can be obtained on Dust Cave Dungeon Final Boss and from the treasure that will require you Dust Cave Key (Silver) to open it.
• Golden Treasure (from Dust Cave Dungeon and you will need a Dust Cave Key (Gold) to open it.
• PVP Rumble Shop
• Vote Item Shop
Note: You can stack up Scroll of Experience (Dragon Rank) two times and get a bonus up to 100% experience. Stack it up first before using the Scroll of Amplification ES.
d. Couple System - a system where you need to couple with other characters.
Mechanics:
• Couple with another character (press O and find propose to the selected character. It doesn't matter if it's a male or female character)
• Level your couple by staying online on the same channel (press J to see your couple skills)
e. Griffin Cage - a pet with a custom effect that gives experience.
Note: Can give additional experience up to 15% when it's class S and perfect (1/3/5/7/9)
f. EXP Cloak or the Double Dragon Cloak - a cloak that gives an additional 10% experience.
Can be obtained by:
• Using collector chips and exchanging on collecting manager.
• Using event tokens and exchanging on event token manager in Flaris.
• PVP Treasure (where you need to summon and kill Illuminati Boss on arena)
g. Lord's & normal Cheer - a cheer which gives you an additional 10% experience. Lord's cheer can be obtained by the ruling Lord of the server while the normal cheer can be obtained by other characters that have been online at least 1hr.
Note: Press O to see how much normal cheer you have and the duration to have another cheer.
CS-Set Quests
Vexx 15.06.2020
Here you can see all CS-Sets that can be farmed through quests. In each Quest you need to kill 200 surrounding Monsters and the corresponding Giant.
[center]Baseball Set
[center]
Autoshout Guide
Vexx 13.06.2020
In order to use the ingame Autoshout you need to have an active Premium.
How do i open the Autoshout?
Autoshout can be opened via Start:


How do i use the Autoshout?
Write down your text in the chat. After click on the message symbol at the left Corner and drag it inside the Autoshout menu.

Now to start the Autoshout spam, you also need to hit the checkmark.

Kill Counter Shop Guide
Vexx 13.06.2020
How can i open the Kill Counter Shop?
Either via the Start Menu at the left corner of your UI or at Jeff located in Central-Flaris:


How to gain Monster Kills?
Every Monster within a level range of 5 you kill will increase your Monster Kill Counter.
How to gain Player Kills?
Every other player you kill will increase your Player Kill Counter.
Icon
Item Name
Player Kills
Monster Kills
Perin
150

Dragon Perin
100

Dust Cave Key (Silver)
50

Dust Cave Key (Gold)
500
Scroll of Amplification ES
100

Weapon Level-Up (1-150)
300
Weapon Level-Up (150-200)
2000
Weapon Level-Up (200-250)
10000
Weapon Level-Up (250-300)
300000
Login Rewards
Caesium 11.06.2019
You will receive a reward everyday you login. You must log in consecutively in order to receive the following day's reward. If a day is missed, the rewards will be reset to Day 1.
Day 1
25x Fresh Ddukguk
Day 2
25x Hot Ddukguk
Day 3
25x Sweet Ddukguk
Day 4
1x FLY
Day 5
1x FOR
Day 6
1x FUN
Day 7
2x Scroll Experience of ES (x1.5 EXP)
Day 8
1x Copper Battery (1 day)

Day 9
1x Daily Cotton Candy Box (Event)
Day 10
5x Blessing of Goddess (Event)
Day 11
4x Upcut Stone
Day 12
4x Grilled Eel
Day 13
50x Remantis Laccotte
Day 14
5x Font Editor

Day 15
5x Scroll of INT

Day 16
5x Scroll of DEX
Day 17
5x Scroll of STA
Day 18
5x Scroll of STR
Day 19
1x Scroll of Faster Pet (14 day)
Day 20
5x Font Editor
Day 21
5x Pride of Victory
Day 22
5x Medicine of Strong STR
Day 23
5x Medicine of Strong DEX
Day 24
5x Medicine of Strong INT
Day 25
5x Medicine of Strong STA
Day 26
5x Christmas Cake
Day 27
2x Love Chocolate
Day 28
10x Dragon Ore

Day 29
1x Baby Panda (CS-PET)
Day 30
1x Grab bag (CS-Sets)

Day 31
10x Blessing of Goddess (Event)
Day 32
10x FLY
Day 33
10x FOR
Day 34
10x FUN
Day 35
2x Scroll Experience of ES (x1.5 EXP)
Day 36
8x Upcut Stone
Day 37
8x Grilled Eel
Day 38
25x FITA cookie (F)
Day 39
25x FITA cookie (I)
Day 40
25x FITA cookie (T)
Day 41
25x FITA cookie (A)
Day 42
5x Pride of Victory
Day 43
1x Natural Bed (7 days)
Day 44
1x Natural Shelf (7 days)
Day 45
1x Natural Mirror (7 days)
Day 46
1x Natural Long Chair (7 days)
Day 47
1x Natural Table (7 days)
Day 48
1x Natural Wardrobe (7 days)
Day 49
1x Premium (14 days)

Day 50
10x Medicine of Strong STR
Day 51
10x Medicine of Strong DEX
Day 52
10x Medicine of Strong INT
Day 53
10x Medicine of Strong STA
Day 54
5000x Fresh Ddukguk
Day 55
5000x Hot Ddukguk
Day 56
5000x Sweet Ddukguk
Day 57
500x Remantis Laccotte
Day 58
100x Blessing of Goddess
Day 59
100x Dragon Ore
Day 60
1x Grab bag (CS-Sets)
Vexx 12.06.2020
Dragon Cloak Guide
Caesium 09.06.2019
Here you can find our Beginner Guide: BEGINNER GUIDE LEVEL 15-105
The Dragon Cloak is Dragon Crusade's stated cloak. This cloak can be leveled up by doing various quests from [Public Office] Julia in southern Flarine.

Whenever you complete a quest for a cloak, you will receive a unique quest item. Alongside this item, you will need addition items to upgrade your cloak. You can upgrade your cloak at [Dragon Chip Dealer] Jeff.

When you start the game, you will start with a Dragon Cloak Level 0.

Effects:
Increase HP +2%
PvE Damage Increase +2%
Speed +4%
Effects:
Increase HP +4%
PvE Damage Increase +4%
Speed +6%
Dragon Cloak 1 Part (1/3)
Spoiler
Doridoma:
Mushpang:

Dragon Cloak 1 Part (2/3)
Spoiler
Giant Lawolf:
Yorrn:

Dragon Cloak 1 Part (3/3)
Spoiler
Mr.Pumpkin:
Giant Mr.Pumpking:

Effects:
Increase HP +6%
PvE Damage Increase +6%
Speed +8%
Dragon Cloak 2 Part (1/5)
Spoiler
Red Mantis Location:

Dragon Cloak 2 Part (2/5)
Spoiler
Giggle Box Location:

Dragon Cloak 2 Part (3/5)
Spoiler
Rock Muscle Location:

Dragon Cloak 2 Part (4/5)
Spoiler
Dumb Bull:

Dragon Cloak 2 Part (5/5)
Spoiler
Cardpuppet Location:

Dragon Cloak 2 Part (6/6)
You can find the larva monsters inside a huge gate in Saint Morning


Effects:
Increase HP +7%
PvE Damage Increase +7%
Speed +10%
Dragon Cloak 3 Part (1/5)
Spoiler
Tombstone Bearer Location:
Giant Tombstone Bearer Location: (Very top of the mountain)

Dragon Cloak 3 Part (2/5)
Spoiler
Basque Location:

Dragon Cloak 3 Part (3/5)
Spoiler
Prankster Location:

Dragon Cloak 3 Part (4/5)
Spoiler
Wheelem Location:

Dragon Cloak 3 Part (5/5)
Spoiler
Leyena Location:


Effects:
Increase HP +8%
PvE Damage Increase +8%
Speed +12%
Dragon Cloak 4 Part (1/4)
Spoiler
Steel Knight Location:

Dragon Cloak 4 Part (2/4)
Spoiler
Volt Location:

Dragon Cloak 4 Part (3/4)
Spoiler
Elderguard Location:

Dragon Cloak 4 Part (4/4)
Spoiler
Crane Machinery Location:


Effects:
Increase HP +9%
PvE Damage Increase +9%
Speed +13%
Dragon Cloak 5 Part (1/3)
Spoiler
Ankle Bracelet of Rangda drop from Horrible Rangda (random)
Horrible Rangda Location:

Dragon Cloak 5 Part (2/3)
Spoiler
Glaphan Location:

Dragon Cloak 5 Part (3/3)
Spoiler
Meteonyker and CyclopsX can be found in Volcano
Meteonyker Location:
CyclopsX Location:

- Vexx

Effects:
Increase HP +10%
PvE Damage Increase +10%
Speed +14%
Dragon Cloak 6 Part (1/3)
Spoiler
Head towards the colloseum near North-Flaris and meet Nicolas de Flamel.


Painit can be found at:

Palladium can be found at:

Mammoth Leather drops randomly from Mammoths in Winter Crusade:
Mutant Yeti Fell drops randomly from Mutant Yetti in Winter Crusade:
Dragon Cloak 6 Part (2/3)
Spoiler

Dragon Cloak 6 Part (2/3) A - copper coil
Hent can be found in Darkon City:

PureCopper drops randomly from Clockwork. He can be found at multiple locations all around Madrigal, e.g.:


Something High Percent can be found inside the Mars Mine Dungeon, located in the northeastern part of Flaris. It's right behind the big door at the end of the Dungeon (Don't forget to bring some Snacks, maybe a Hotdog?).

Dragon Cloak 6 Part (2/3) B - Energy Core
Lobiet can be found in Darkon 3:

Shining Stone drops randomly from Giant Kern. He can be found in Darkon 3:

Pure Manatrank can be found near the Mars Mine Dungeon:

Dragon Cloak 6 Part (2/3) C - Energy capacitor
Mawrang can be found in the City of Kaillun/Eillun:

Luminous RubiksCube drops randomly from Kalgas Dungeon[strike]Chief Keokuknav/Barga in Kaillun/Eillun[/strike]:

Twinkies can be found near the Mayor's house in Flaris:
Dragon Cloak 6 Part (2/3) D - Silicon
Meet Julia back in Flaris.

Impure Silicon drops randomly from Rangda. She can be found at multiple locations in Darkon1:

Polishing paste can be found in Darkon 3:


Now go back to Nicolas de Flamel
Dragon Cloak 6 Part (3/3)
Spoiler


Dragon Cloak 6 Part (3/3) A - Mad Dwarf
Mayor of SainCity can be found in Saint Morning

Dragon Cloak 6 Part (3/3) A - Mad Dwarf - Passport A38
Ann can be found in Saint Morning:

All needed Forms can be found at these locations:

Dragon Cloak 6 Part (3/3) A - Mad Dwarf - Pudding with Arsenic
Sotta can be found in Flaris:

Charlie can be found in Flaris:

Lump Arsrenic drops randomly from Giant Mushpoie. He can be found in Darkon 3:

Dragon Cloak 6 Part (3/3) A - Mad Dwarf - Polyjuice Potion
Shyniff can be found in Darkon 3:


Florfliegen drops randomly from Giant Hoppre. He can be found in Darkon 3:
leech drops randomly from Giant Watangka. He can be found in Darkon 3:
River grass can be found in Garden of Rhisis:

Kneading oak/Knotweed can be found in Darkon 3:

Ground Horn drops randomly from Kheldor. He can be found in the Catacombs of Anguish in the Valley of the Risen:
Tree snake skin drops randomly from Giant Antiquery. He can be found in Darkon 3:
Dragon Cloak 6 Part (3/3) A - Mad Dwarf - Hair of a Dwarf
Rutam can be found in Kaillun/Eillun City:


Now go back to the Mayer of Saint Morning.
Dragon Cloak 6 Part (3/3) B - Arkenstein
Drago can be found in Flaris City:


Book of the First Age drops randomly from the Monument of Death inside Ankou's Asylum:
Saruman can be found in Kaillun/Eillun City:


Sauron can be found inside the Volcano Dungeon on top of the volcano:


Crown of the Cursed King drops randomly from Rex Potato( King). He can be found inside the colloseum near North-Flaris


Go back to Nicolas de Flamel.

Effects:
Increase HP +11%
PvE Damage Increase +11%
Speed +15%
Spoiler

You've already collected everything during the previous quests.

Effects:
Increase HP +12%
PvE Damage Increase +12%
Speed +16%
Dragon Cloak 8 Part (1/2)
Spoiler
Meet Drago in Flaris City.

The Basilisk of the Great Maw can be found in the Bahara Desert:
The Guardian Thunder Lizards[Dr. 10] can be found at Fireland.
Dragon Cloak 8 Part (2/2)
Spoiler

The Guan Yu Heavyblade/Turtleking can be found in Rartesia/Traseia:
The Guardian Hellstep [Dr. 35] can be found at Fireland.
Level up your previously received Green Angel towards 100%. Simply double click it. It follows you around whilst collecting XP during your lvling progress, might take some time. (It does not steal any of your received XP)

Effects:
Increase HP +13%
PvE Damage Increase +13%
Speed +17%
Spoiler

[Deathbringer] Kheldor can be found inside the Catacombs of Anguish in the Valley of the Risen:
The Guardian Blightface [Dr. 40] can be found at Fireland.
Level up your previously received Blue Angel towards 100%. Simply double click it. It follows you around whilst collecting XP during your lvling progress, might take some time. (It does not steal any of your received XP)

Effects:
Increase HP +15%
PvE Damage Increase +15%
Speed +20%
Spoiler

[God of Death] Ankou can be found inside Ankou's Asylum at Kaillun/Eillun:
The Guardian Living Fire [Dr. 45] can be fount at Fireland.
Level up your previously received Red Angel towards 100%. Simply double click it. It follows you around whilst collecting XP during your lvling progress, might take some time. (It does not steal any of your received XP)
Vexx 12.06.2020
Weapon Wiki
Vexx 11.06.2020
Almost every weapon in Dragon Crusade had been restated and re-balanced to give players more option to choose how and what play style they want with their character. Whether you want to rekt those peoples' asses or kill a small - humongous creature like yourself.
Knight | Templar
Spoiler
Knights can also equip the weapons of a non-Master Blade (except Vampire).
Weapon Name
Level Required
Weapon Effect
Guardian Big Sword
60
Max. HP +200
DEF +30
Guardian Ambidextrous Axe
60
DEX +5
DEF +30
Historic Big Sword
75
Hit +15%
Attack Speed +10%
Historic Ambidextrous Axe
75
Attack Speed +10%
Hit +20%
Angel Big Sword
90
DEX +10
Increased Critical Damage +35%
Angel Ambidextrous Axe
90
STR +10
Critical Chance +15%
Legendary Golden Big Sword
105
STR +2
Attack Speed +18%
Legendary Big Golden Axe
105
Increased HP +18%
STR +6
Bloody Slayer
120
STR +6
Ranged Block +10%
Increased HP +20%
Bloody Two-Handed Axe
120
Increased HP +18%
STR +10
Increased FP +10%
Lusaka's Heavy Sword
75
Melee Block +10%
DEF +100
Lusaka's Heavy Axe
75
Increased HP +20%
STR +10
Lusaka's Heavy Crystal Sword
75-M
Increased HP +20%
Ranged Block +10%
Melee Block +10%
Lusaka's Heavy Crystal Axe
75-M
Increased HP +18%
STR +10
STA +10
Phantasmal Slayer
80
Attack Speed +16%
Critical Chance +24%
Cleaver of the Mist
80
Melee Block +15%
Increased HP +15%
Mystic Phantasmal Slayer
80-M
Attack Speed +21%
Critical Chance +30%
Increased Critical Damage +34%
Mystic Cleaver of the Mist
80-M
Melee Block +19%
Increased HP +19%
Increased Attack +8%
Leviathan
95
Attack Speed +19%
Critical Chance +27%
Abyss
95
Melee Block +17%
Increased HP +17%
Majestic Leviathan
95-M
Attack Speed +24%
Critical Chance +34%
Increased Critical Damage +39%
Majestic Abyss
95-M
Melee Block +21%
Increased HP +21%
Increased Attack +9%
Kingslayer
110
Attack Speed +21%
Critical Chance +31%
Increased Critical Damage +35%
Monarch
110
Melee Block +19%
Increased HP +19%
Increased Attack +8%
Mastercraft Kinglsayer
110-M
Attack Speed +27%
Critical Chance +39%
Increased Critical Damage +44%
Mastercraft Monarch
110-M
Melee Block +24%
Increased HP +24%
Increased Attack +10%
Vampire Slayer
120
Increased HP +20%
Ranged Block +10%
Melee Block +10%
Vampire Two-Hand Axe
120
Increased HP +20%
Increased DEF +10%
STA +15
Ancient Two-Hand Sword
120-M
Attack Speed +20%
Critical Chance +50%
Increased Critical Damage + 60%
Ancient Two-Hand Axe
120-M
Increased HP +25%
Increased DEF +30%
STA +20
Vorpal Blade
130-M
Critical Chance +15%
Increased Critical Damage +25%
Attack Speed +15%
The Doom Guard
130-M
Critical Chance +4%
Increased Critical Damage +4%
Hit +4%
Behemoth's Slayer
135-H
Critical Chance +50%
Increased Critical Damage +65%
Increased Attack +25%
Behemoth's Two-Handed Sword
135-H
Increased HP +45%
STA +60
Max. HP +5000
Behemoth's Two-Handed Axe
135-H
Increased HP +45%
Ranged Block +15%
Melee Block +15%
Shiny Behemoth's Slayer
135-H
Critical Chance +55%
Increased Critical Damage +70%
Increased Attack +30%
Shiny Behemoth's Two-Handed Sword
135-H
Increased HP +50%
STA +75
Max. HP +7000
Shiny Behemoth's Two-Handed Axe
135-H
Increased HP +50%
Ranged Block +18%
Melee Block +18%
Behemoth's Shield
135-H
Increased HP +10%
Ranged Block +5%
Melee Block +5%
Shiny Behemoth's Shield
135-H
Increased HP +12%
Ranged Block +7%
Melee Block +7%
Bloody Dragon Slayer
Dr. 40
Critical Chance +70%
Increased Critical Damage +85%
Increased Attack +40%
Bloody Dragon Two-Handed Sword
Dr. 40
Increased HP +55%
STA +90
Max. HP +9000
Bloody Dragon Two-Handed Axe
Dr. 40
Increased HP +55%
Ranged Block +20%
Melee Block +20%
Blade | Slayer
Spoiler
Weapon Name
Level Required
Weapon Effect
Guardian Sword
60
STA +5
DEX +5
Guardian Axe
60
DEF +30
Reflect Damage +5%
Historic Sword
75
STR +5
Critical Chance +7%
Historic Axe
75
Increased HP +20%
Attack Speed +7%
Angel Sword
90
Increased HP +15%
Attack Speed +10%
Angel Axe
90
DEX +7
Critical Chance +20%
Legendary Golden Sword
105
Hit +10%
Attack Speed +15%
Legendary Golden Axe
105
Increased Critical Damage +40%
Critical Chance +20%
Bloody Sword
120
Increased Critical Damage +40%
Critical Chance +30%
Attack Speed +15%
Bloody Axe
120
STA +10
DEF +75
Increased HP +15%
Lusaka's Sword
75
Critical Chance +10%
Attack Speed +10%
Lusaka's Axe
75
Increased HP +15%
DEF +50
Lusaka's Crystal Sword
75-M
Critical Chance +10%
Hit +20%
Attack Speed +20%
Lusaka's Crystal Axe
75-M
Critical Chance +20%
Increased Critical Damage +30%
Increased Attack +10%
Sword of Whisper
80
Attack Speed +15%
Critical Chance +20%
Spectre's Axe
80
Increased Attack +7%
Critical Chance +12%
Mystic Sword of Whisper
80-M
Attack Speed +19%
Critical Chance +26%
Increased Critical Damage +28%
Mystic Spectre's Axe
80-M
Increased Attack +9%
Critical Chance +15%
Attack Speed +16%
Coral Cutlass
95
Attack Speed +17%
Critical Chance +23%
Nautilus
95
Increased Attack +8%
Critical Chance +13%
Majestic Coral Cutlass
95-M
Attack Speed +21%
Critical Chance +29%
Increased Critical Damage +32%
Majestic Nautilus
95-M
Increased Attack +10%
Critical Chance +17%
Attack Speed +18%
Regalia
110
Attack Speed +19%
Critical Chance +27%
Increased Critical Damage + 29%
Bishop
110
Increased Attack +9%
Critical Chance +15%
Attack Speed +16%
Mastercraft Regalia
110-M
Attack Speed +24%
Critical Chance +33%
Increased Critical Damage +36%
Mastercraft Bishop
110-M
Increased Attack +11%
Critical Chance +19%
Attack Speed +20%
Vampire Blade
120
Hit +20%
DEX +20
Critical Chance +30%
Vampire Axe
120
Critical Chance +10%
Increased Critical Damage +40%
Increased Attack +5%
Ancient One-hand Sword
120-M
Critical Chance +30%
Increased Critical Damage +40%
Attack Speed +25%
Ancient One-hand Axe
120-M
STR +40
Increased Critical Damage +40%
Increased Attack +10%
Behemoth's One-Handed Sword
135-H
Increased Attack +30%
Increased Critical Damage +50%
Critical Chance +70%
Behemoth's One-Handed Axe
135-H
STR +70
Increased Critical Damage +70%
Increased Attack +20%
Shiny Behemoth's One-Handed Sword
135-H
Increased Attack +35%
Increased Critical Damage +55%
Critical Chance +75%
Shiny Behemoth's One-Handed Axe
135-H
STR +75
Increased Critical Damage +75%
Increased Attack +25%
Bloody Dragon One-Handed Sword
Dr. 40
Increased Attack +45%
Increased Critical Damage +65%
Critical Chance +85%
Bloody Dragon One-Handed Axe
Dr. 40
STR +90
Increased Critical Damage +85%
Increased Attack +35%
Jester | Harlequin
Spoiler
Weapon Name | Dungeon
Level Required
Weapon Effect
Guardian Yo-Yo
60
Attack Speed +10%
DEF +30
Historic Yo-Yo
75
DEX +7%
Increased Critical Damage +28%
Angel Yo-Yo
90
STR +10
DEX +5
Legendary Golden Yo-Yo
105
Increased HP +15%
Attack Speed +10%
Bloody Yo-Yo
120
DEX +10
DEF +100
Increased HP +15%
Lusaka's Yo-Yo
75
Increased Critical Damage +20%
DEX +10
Lusaka's Crystal Yo-Yo
75-M
Critical Chance +10%
Increased Critical Damage +20%
Attack Speed +10%
Jewel of Nightmares
80
Increased Critical Damage +18%
Attack Speed +11%
Mystic Jewel of Nightmares
80-M
Increased Critical Damage +23%
Attack Speed +14%
Increased Attack +8%
Typhoon
95
Increased Critical Damage +21%
Attack Speed +12%
Majestic Typhoon
95-M
Increased Critical Damage +26%
Attack Speed +16%
Increased Attack +9%
Viceroy
110
Increased Critical Damage +23%
Attack Speed +14%
Increased Attack +8%
Mastercraft Viceroy
110-M
Increased Critical Damage + 29%
Attack Speed +18%
Increased Attack +10%
Vampire Yo-Yo
120
Critical Chance +20%
Increased Critical Damage +30%
Ancient Yo-Yo
120-M
Critical Chance +35%
Increased Critical Damage +40%
STR +40
Behemoth's Yoyo
135-H
Critical Chance +60%
Increased Critical Damage +80%
Increased Attack +30%
Shiny Behemoth's Yoyo
135-H
Critical Chance +65%
Increased Critical Damage +85%
Increased Attack +35%
Bloody Dragon Yoyo
Dr. 40
Critical Chance +75%
Increased Critical Damage +95%
Increased Attack +45%
Ranger | Crackshooter
Spoiler
Weapon Name | Dungeon
Level Required
Weapon Effect
Guardian Bow
60
Increased HP + 15%
Critical Chance +20%
Historic Bow
75
DEX +10
STA +4
Angel Bow
90
Increased HP +20%
Hit +20%
Legendary Golden Bow
105
Increased Critical Damage +40%
Attack Speed +10%
Bloody Bow
120
Increased Critical Damage +40%
Critical Chance +20%
Increased Attack +10%
Lusaka's Bow
75
Increased HP +20%
DEX +10
Lusaka's Crystal Bow
75-M
Critical Chance +20%
Increased Critical Damage +45%
Increased HP +20%
Bow of Echoes
80
Increased Critical Damage +27%
Critical Chance +27%
Mystic Bow of Echoes
80-M
Increased Critical Damage +34%
Critical Chance +34%
Increased Attack +12%
Nemo's Fury
95
Increased Critical Damage +31%
Critical Chance +31%
Majestic Nemo's Fury
95-M
Increased Critical Damage +39%
Critical Chance +39%
Increased Attack +13%
Baroness
110
Increased Critical Damage +35%
Critical Chance +35%
Increased Attack +12%
Mastercraft Baroness
110-M
Increased Critical Damage +44%
Critical Chance +44%
Increased Attack +15%
Vampire Bow
120
Critical Chance +25%
Increased Critical Damage +35%
DEX +25
Ancient Bow
120-M
Increased Critical Damage +45%
Increased Attack +20%
DEX +40
Behemoth's Bow
135-H
Critical Chance +45%
Increased Critical Damage +85%
Increased Attack +30%
Shiny Behemoth's Bow
135-H
Critical Chance +50%
Increased Critical Damage +90%
Increased Attack +35%
Bloody Dragon Bow
Dr. 40
Critical Chance +60%
Increased Critical Damage +100%
Increased Attack +45%
Ringmaster | Seraph
Spoiler
Ringmaster/Seraph can also equip the Knuckles of a Billposter/Force Master (via Start -> Extra -> Item Professtion).
Weapon Name | Dungeon
Level Required
Weapon Effect
Guardian Stick
60
INT +3
Increased HP +15%
Historic Stick
75
Increased MP +20%
INT +2
Angel Stick
90
INT +4
Increased HP+10%
Legendary Golden Stick
105
INT +20
Decreased Casting Time +10%
Bloody Stick
120
INT +15
Decreased Casting Time +20%
Increased MP +20%
Lusaka's Stick
75
DEF +100
INT +10
Lusaka's Crystal Stick
75-M
INT +20
Decreased Casting Time +20%
Increased MP +20%
Mirage
80
INT +12
Decreased Casting Time +15%
Mystic Mirage
80-M
INT +16
Decreased Casting Time +19%
Increased Attack +19%
Song of Sirens
95
INT +14
Decreased Casting Time +17%
Majestic Song of Sirens
95-M
INT +18
Decreased Casting Time +21%
Increased Attack +21%
Duchess
110
INT +16
Decreased Casting Time +19%
Increased Attack +19%
Mastercraft Duchess
110-M
INT +20
Decreased Casting Time +24%
Increased Attack +24%
Vampire Stick
120
INT +20
Decreased Casting Time +20%
Increased MP +20%
Ancient Stick
120-M
STA +35
Decreased Casting Time +30%
Increased HP 25%
Behemoth's [Stick/td]
135-H
STA +45
Decreased Casting Time +35%
Increased HP +40%
Shiny Behemoth's [Stick/td]
135-H
STA +50
Decreased Casting Time +40%
Increased HP +45%
Bloody Dragon Stick
Dr. 40
STA +60
Decreased Casting Time +50%
Increased HP +55%
Billposter | Force Master
Spoiler
Billposter/Force Master can also equip the Sticks of a non-Master Ringmaster (except Vampire).
Weapon Name | Dungeon
Level Required
Weapon Effect
Guardian Knuckle
60
Attack Speed +15%
Increased HP +15%
Historic Knuckle
75
DEX +5
Critical Chance +13%
Angel Glove
90
Increased HP +15%
Hit +20%
Legendary Golden Gloves
105
Increased Critical Damage +38%
Attack Speed +10%
Bloody Knuckle
120
Additional Damage +250
DEF +100
Increased HP +20%
Lusaka's Fist
75
Increased HP +10%
STR +10
Lusaka's Crystal Fist
75-M
Increased HP +28%
Increased DEF +18%
STA +18
Knuckle of Madness
80
Increased Critical Damage +22%
Critical Chance +22%
Mystic Knuckle of Madness
80-M
Increased Critical Damage +28%
Critical Chance +28%
Melee Block +14%
Fist of Tides
95
Increased Critical Damage +25%
Critical Chance +25%
Majestic Fist of Tides
95-M
Increased Critical Damage +32%
Critical Chance +32%
Melee Block +16%
Godhand
110
Increased Critical Damage +29%
Critical Chance +29%
Melee Block +14%
Mastercraft Godhand
110-M
Increased Critical Damage +36%
Critical Chance +36%
Melee Block +18%
Vampire Knuckle
120
Increased Attack +15%
Critical Chance +25%
Increased Critical Damage +40%
Ancient Knuckle
120-M
Increased Attack +20%
Critical Chance +30%
Increased Critical Damage +70%
Demonic Eye
130-M
Increased Attack +8%
Increased Critical Damage +8%
Critical Chance +8%
Behemoth's Knuckle
135-H
Increased Attack +37%
Increased Critical Damage +90%
Critical Chance +60%
Shiny Behemoth's Knuckle
135-H
Increased Attack +42%
Increased Critical Damage +95%
Critical Chance +65%
Behemoth's Forcegem
135-H
INT +20
Increased HP +20%
STR +20
Shiny Behemoth's Forcegem
135-H
INT +25
Increased HP +25%
STR +25
Bloody Dragon Knuckle
Dr. 40
Increased Attack +52%
Increased Critical Damage +105%
Critical Chance +75%
Psykeeper | Mentalist
Spoiler
Weapon Name | Dungeon
Level Required
Weapon Effect
Guardian Wand
60
Decreased Casting Time +10%
DEF +30
Historic Wand
75
Max MP +125
INT +5
Angel Wand
90
Increased HP +15%
Increased MP +15%
Legendary Golden Wand
105
Decreased Casting Time +15%
Increased HP +10%
Bloody Wand
120
INT +10
Decreased Casting Time +15%
Increased HP +20%
Lusaka's Wand
75
Decreased Casting Time +10%
INT +10
Lusaka's Crystal Wand
75-M
INT +15
Decreased Casting Time +17%
Increased Attack +10%
Wand of Apparitions
80
Decreased Casting Time +15%
Increased Attack +15%
Mystic Wand of Apparitions
80-M
Decreased Casting Time +19%
Increased Attack +19%
INT +16
Lamprey's Wand
95
Decreased Casting Time +17%
Increased Attack +17%
Majestic Lamprey's Wand
95-M
Decreased Casting Time +21%
Increased Attack +21%
INT +18
Archduke
110
Decreased Casting Time +19%
Increased Attack +19%
INT +16
Mastercraft Archduke
110-M
Decreased Casting Time +24%
Increased Attack +24%
INT +20
Vampire Wand
120
INT +15
Decreased Casting Time +17%
Increased Attack +10%
Ancient Wand
120-M
INT +55
Decreased Casting Time +30%
Increased Attack +35%
Grimore of the Risen
130-M
INT +8
Decreased Casting Time +8%
Increased Attack +4%
Behemoth's Wand
135-H
INT +100
Decreased Casting Time +40%
Increased Attack +40%
Shiny Behemoth's Wand
135-H
INT +105
Decreased Casting Time +45%
Increased Attack +45%
Book of Behemoth
135-H
INT +50
PvE Damage Increase +25%
Increased Attack +15%
Shiny Book of Behemoth
135-H
INT +55
PvE Damage Increase +30%
Increased Attack +20%
Bloody Dragon Wand
Dr. 40
INT +110
Decreased Casting Time +55%
Increased Attack 55%
Elementor | Arcanist
Spoiler
Weapon Name | Dungeon
Level Required
Weapon Effect
Guardian Staff
60
Max. HP +200
Max. MP +200
Historic Staff
75
Increased MP +10%
INT +5
Angel Staff
90
DEF +10
INT +3
Legendary Golden Staff
105
INT +5
Decreased Casting Time +10%
Bloody Staff
120
INT +10
Decreased Casting Time +10%
Increased MP +20%
Lusaka's Staff
75
Increased MP +15%
INT +10
Lusaka's Crystal Staff
75-M
INT +15
Decreased Casting Time +10%
Increased Attack +20%
Staff of Ethereal Dreams
80
Decreased Casting Time +15%
Increased Attack +24%
Mystic Staff of Ethereal Dreams
80-M
Decreased Casting Time +10%
Increased Attack +30%
Melee Block +12%
Conch Stave
95
Decreased Casting Time +17%
Increased Attack +27%
Majestic Conch Stave
95-M
Decreased Casting Time +21%
Increased Attack +34%
Melee Block +13%
Queen's Mercy
110
Decreased Casting Time +19%
Increased Attack +31%
Melee Block +12%
Mastercraft Queen's Mercy
110-M
Decreased Casting Time +24%
Increased Attack +39%
Melee Block +15%
Vampire Staff
120
INT +15
Decreased Casting Time +10%
Increased Attack +18%
Ancient Staff
120-M
INT +35
Decreased Casting Time +35%
Increased Attack +38%
Behemoth's Staff
135-H
INT +80
Decreased Casting Time +40%
Increased Attack +50%
Shiny Behemoth's Staff
135-H
INT +85
Decreased Casting Time +45%
Increased Attack +55%
Bloody Dragon Staff
Dr. 40
INT +95
Decreased Casting Time +55%
Increased Attack +65%
This Topic might be outdated (Last update 11/6/20). For an up-to-date overview use the Item Wiki ingame.
Weapon Level Guide
Caesium 19.06.2019
Every weapon in Dragon Crusade contains its very own level. Whenever your weapon levels up, it will gain Bonus Damage and a higher Gear Score. Your weapon levels whenever you kill a monster with the weapon.
Weapon level, Bonus damage and Gear Score are all listed on the weapon itself.

As you level the weapon, the weapon will get stronger.

Do blades get bonus damage from both weapons?
Spoiler
No. Any class with two weapons or a shield will not benefit from the second weapon's level. This is the same scenario with Gear Score.
What monsters will give weapon levels?
Spoiler
All monsters in madrigal up to 5 levels below your level will have a chance to level up your weapon. For example, if you are level 67, all monsters level 62+ may level up your weapon.
How high can I level weapons?
Spoiler
Every weapon class got its own tier. The higher the level requirement of the weapon, the higher they can level up.
Weapon requirement (Level)
Max. obtainable Weapon Level
1
25
15
30
25
40
30
50
40
60
60
100
70
100
80
100
90
100
100
100
110
100
120
150
135
200
150
200
Dr. 40
300
How does the weapon level scale? (Difficulty)
Spoiler
The weapon's leveling rate depends on the weapon's required level. Below you can find a detailed table of how to level the weapon.
Required Level
Difficulty (Higher Is Harder)
1
0.48
15
0.60
25
0.72
30
0.42
40
0.42
60
0.21
70
0.24
80
0.50
90
0.50
100
0.50
110
0.50
120
1.00
135
1.80
150
1.7
Dr. 40
2.00
How does the weapon level?
Spoiler
As the weapon level increases, it will get more difficult to level the weapon. The weapon level is chance based instead of the traditional EXP base system such as character leveling.
Weapon Level
Bonus Damage
Chance Of Leveling Up (1 in X Monster Kills * Difficulty)
1
0%
5
10
2%
5
20
5%
10
30
7%
15
40
10%
20
50
13%
25
60
15%
30
70
18%
35
80
21%
40
90
24%
45
100
28%
100
110
31%
110
120
34%
120
130
37%
130
140
41%
140
150
44%
150
160
47%
760
170
49%
770
180
52%
880
190
55%
900
200
57%
950
210
60%
2500
220
63%
3000
230
66%
3500
240
69%
4000
250
72%
4500
260
75%
75000
270
78%
10000
280
81%
20000
290
84%
40000
300
87%
200000
Vexx 11.06.2020
Monster Buffs
Caesium 06.08.2019
Icon
Buff Name
Monster(s)
Effect

Aibatt Beginner Bonus
Aibatt
Speed +5%

Lawolf Beginner Bonus
Lawolf
All Stats +5

Bang Beginner Bonus
Bang
Hit +5%

Overshadow Buff
Giant Bang / Wagsaac / Mia / Mr. Pumpkin / Red Mantis
Attack +5%

Pineapple Buff
Giant Jack The Hammer / Giggle Box / Rock Muscle / Hobo / Dumb Bull
HP +5%

Redemption Buff
Giant Totemia / Cardpuppet / Tomstone Bearer / Basque / Prankster
Decreased Casting Time +5%

Thunder Buff
Giant Wheelem / Leyena / Steamwalker / Steel Knight / Nutty Wheel
Increase Critical Damage +5%

Dreamstate Buff
Giant Driller / Volt / Elderguard / Garbagepider / Crane Machinery
Critical Chance +8%

Friction Buff
Giant Mothbee / Flbyrigen / Rockepeller / Circus Bear / Greemong
Speed +8%

Barbossa Buff
Giant Pire / Clawdoll / Carrier Bomb / Rampage Butcher / Froziest
All Stat +8

Eclipse Buff
Giant Burnbird / Buketfoot / Nuctucehicle / Syliaca / Risem
Hit +8%

Sagittarius Buff
Giant Bucrow / Scopicon / Tangfoma / Grrr / Dump
Attack +8%

Urban Buff
Giant Nautrepy / Boo / Hoppre / Mushpoie / Iren
HP +8%

Volunteer Buff
Giant Watangka / Antiquery / Luia / Gongury / Shuhamma
Decrease Casting Time +8%

Prologue Buff
Giant Kern / Glaphan / Toadrin / Araknoid / Reptilion
Increased Critical Damage +8%

Harmony Buff
Giant Troglodon / White Bolo / [General] Razgul / Chief Keokuk
Critical Chance +8%

Giant Bonus Buff
Silverwing Duchess / [Queen of Thorns] Entaness / [Terror] King Chiton
Speed +10%

Giant Master Bonus Buff
Ace Silverwing Dutchess / [Vile Queen of Thorns] Entaness / [Abyssal Terror] King Chiton
All Stat +10

Tramnuk Bonus Buff
Beast King Khan
Hit +10%
Speed +10%

Master Tramnuk Buff
Beast Overlord Khan
Attack +10%
Speed +10%

Vampire Bonus Buff
Drakul the Diabolic
HP +10%
Decreased Casting Time +15%

Ancient Bonus Buff
Dread Drakul the Diabolic
HP +10%
Decreased Casting Time +15%

Devos Bonus Buff
[Deathbringer] Kheldor
Attack +10%
Hit +15%

Behemoth Bonus Buff
[God of Death] Ankou
Increased Critical Damage +10%
Critical Chance +15%

Hydros Bonus Buff
[God of Wrath] Kalgas
All Stats +25
Speed +18%

Baphomet Bonus Buff
[Ancient] Baphomet
All Stats +25
EXP +10%
Speed +25%
Retjack Bonus Buff
[Lord of Dust Cave] Retjack
All Stats +10
HP +10%
Speed +10%
Basilisk Bonus Buff
Fire Basilisk
All Stats +20
PvE +10%
Speed +20%
Crystal Demon Bonus Buff
Crystal Demon
Increased Attack +10%
Speed +15%
Crimson Bonus Buff
[Lord of Fire] Crimson
All Stats +25
Increased Critical Damage +25%
Speed +25%

Dark Phoenix Bonus Buff
[Divine] Dark Phoenix
All Stats +20
PvE Damage Increase +12%
Speed +25%
Maniac Worldboss Buff
[Worldboss] Moley
All Stats +12
Attack +12%
Speed +15%

Taurus Worldboss Buff
[Worldboss] Minz Dragon
All Stats +12
HP +12%
Speed +15%

Thunder Worldboss Buff
[Worldboss] Ginyu Frog
All Stats +12
Increased Critical Damage +15%
Speed +15%

Cataclysm Worlboss Buff
[Worldboss] Mothra / [Worldboss] Olipfand
All Stats +12
Hit +15%
Speed +15%

Cottage Worldboss Buff
[Worldboss] Ragu / [Worldboss] Ancient Morla
All Stats +12
Decreased Casting Time +15%
Speed +15%
Vexx 11.06.2020
Equipment Wiki
siijayr 02.09.2019
Almost every set in Dragon Crusade has been restated and re-balanced to give players more option to choose how and what play style they want with their character. Whether you want to rekt those peoples' asses or kill a small - humongous creature like yourself.
Vagrant
Spoiler
Set Name
Level Required
Set Effect
Parmil / Leaf Set
1
STR +15
Speed +20%
Increased HP +5%
Mercenary
Spoiler
Set Name
Level Required
Set Effect
Petal / Flower Set
15
Increased Attack Power (Sword) +4
Increased Attack Power (Axe) +4
Increashed HP +10%
Attack Speed +20%
Cylos / Comet Set
30
Def +55
Critical Chance +5%
Hit +10%
Stitch / Pangrril Set
45
Def +45
Decreased FP Consumption +10%
Increased HP +10%
Attack Speed +20%
Recorn / Rescorn Set
60
Attack Speed +15%
Increased HP +10%
Critical Chance +15%
Acrobat
Spoiler
Set Name
Level Required
Set Effect
Stinger / Slepint Set
15
Critical Chance +10%
Attack Speed +10%
DEX +5
Miracle / Layered Set
30
Increased Critical Damage +15%
Critical Chance +10%
DEX +15
Hyper / Cruiser Set
45
DEF +41
Decreased FP Consumption +20%
Decreased MP Consumption +20%
Increased Critical Damage +20%
Increased Attack Power (Yo-Yo) +100
Increased Attack Power (Bow) +100
Rebron / Restron Set
60
Attack Speed +10%
STR +10
Critical Chance +10%
Increased Critical Damage +30%
Assist
Spoiler
Set Name
Level Required
Set Effect
Curus / Sardine Set
15
Attack Speed +10%
STR +15
DEX +15
Sayram / Talin Set
30
STR +15
Attack Speed +10%
Increased Critical Damage +15%
Critical Chance +10%
Flury / Wedge Set
45
Def +38
INT +7
Decreased MP Consumption +20%
Decreased FP Consumption +20%
Decreased Casting Time +20%
Shurand / Shuran Set
60
Increased HP +15%
STA +10
DEF +100
Increased DEF +5%
Magician
Spoiler
Set Name
Level Required
Set Effect
Niz / Seer Set
15
Increased HP +10%
Decreased Casting Time +10%
INT +10
Merr / Sorain Set
30
Speed +10%
Decreased Casting Time +10%
INT +10
Misty / Teba Set
45
Speed +15%
INT +10
Decreased Casting Time +15%
Ahes / Anoos Set
60
INT +10
Speed +10%
Decreased Casting Time +15%
Knight
Spoiler
Set Name
Level Required
Set Effect
Warpon / Warspon Set
75
Hit +15%
Critical Chance +15%
Increased Critical Damage +15%
Attack Speed +15%
Wees / Weeshian Set
90
Increased DEF +10%
Melee Block +15%
Ranged Block +15%
Increased HP +10%
Ectro / Extro Set
105
Critical Chance +20%
Attack Speed +15%
Increased Critical Damage +40%
Hit +10%
Knighert / Knighz Set
105
Increased HP +18%
Melee Block +10%
Ranged Block +10%
Increased DEF +10%
Cruentus Set
120
Increased Attack +15%
PvE Damage Increase +10%
Increased Critical Damage +55%
Critical Chance +25%
Bileire / Bilari Set
125
Ranged Block +12%
Increased DEF +15%
Increased HP +28%
Melee Block +12%
Bileire / Bilari 1on1 Set
125
Increased Attack +22%
PvE Damage Increase +15%
Increased Critical Damage +70%
Critical Chance +35%
Blade
Spoiler
Set Name
Level Required
Set Effect
Einy / Akan Set
75
Increased HP +15%
DEX +25
Melee Block +10%
Dayst / Dest Set
90
DEX +25
Critical Chance +20%
Increased Critical Damage +10%
Attack Speed +15%
Hanes / Haganes Set
105
Increased Critical Damage +30%
Critical Chance +20%
STR +15
Blain / Virain Set
105
Increased DEF +20%
Ranged Block +20%
Melee Block +20%
Increased HP +15%
Noctis / Nox Set
120
STR +25
Critical Chance +25%
Increased Critical Damage +30%
Increased Attack +10%
Heraud / Herainn Set
125
Hit +20%
Critical Chance +30%
Increased Attack +20%
Increased Critical Damage +50%
Jester
Spoiler
Set Name
Level Required
Set Effect
Katria / Kanarin Set
75
Increased Critical Damage +35%
Critical Chance +15%
Increased Attack +10%
STR +15
Restra / Rasra Set
90
Increased Critical Damage +40%
Critical Chance +20%
Increased Attack +15%
STR +15
Neis / Nation Set
105
Speed +10%
Increased Attack +20%
STR +25
PvP Damage Increase +10%
Jesis / Jenes Set
105
Increased DEF +15%
Ranged Block +20%
Melee Block +20%
Increased HP +15%
Velox Set
120
STR +25
Increased Critical Damage +55%
Critical Chance +30%
Increased Attack +25%
Curio / Curena Set
125
Increased Critical Damage +65%
Hit +25%
Critical Chance +35%
Increased Attack +30%
Ranger
Spoiler
Set Name
Level Required
Set Effect
Oska / Okas Set
75
Critical Chance +15%
Increased Critical Damage +30%
DEX +15
DEF +29
Asren / Aren Set
90
Critical Chance +15%
Increased Critical Damage +40%
DEX +25
Attack Speed +20%
Tyrent / Tight Set
105
Critical Chance +25%
Increased HP +12%
PvE Damage Increase +10%
Increased Critical Damage +45%
Ranerz / Raze Set
105
Increased DEF +20%
Ranged Block +20%
Melee Block +20%
Increased HP +15%
Acer Set
120
PvE Damage Increase +5%
Critical Chance +25%
Increased Critical Damage +50%
Increased Attack +10%
Hainure / Hanira Set
125
PvE Damage Increase +10%
Increased Critical Damage +70%
Increased Attack +15%
Critical Chance +35%
Ringmaster
Spoiler
Set Name
Level Required
Set Effect
Pact / Paxt Set
75
Increased HP +10%
DEF +27
INT +10
STA +25
Shupon / Shrian Set
90
DEF +47
Decreased Casting Time +20%
Decreased MP Consumption +20%
INT +20
Navil / Neclus Set
105
Critical Chance +15%
Increased Critical Damage +50%
Hit +10%
Increased Attack +5%
Rimyth / Remingster Set
105
Increased DEF +20%
Ranged Block +20%
Melee Block +20%
Increased HP +15%
Revenio Set
120
Increased HP +20%
Increased DEF +22%
Decreased Casting Time +30%
Melee Block +10%
Ranged Block +10%
Reine / Rayne Set
125
Hitrate +10%
Increased Critical Damage +70%
Increased Attack +15%
STR +30
Billposter
Spoiler
Set Name
Level Required
Set Effect
Alext / Ales Set
75
Hit +10%
Critical Chance +15%
Attack Speed +10%
DEF +22
Akent / Aken Set
90
STR +15
Increased MP +10%
Decreased Casting Time +15%
DEF +21
Rody / Rodey Set
105
Increased Critical Damage +40%
Hit +12%
Critical Chance +20%
DEF +20
Billst / Billporon Set
105
Increased DEF +20%
Ranged Block +20%
Melee Block +20%
Increased HP +15%
Grim Set
120
STR +30
Increased Attack +10%
Critical Chance +30%
Increased Critical Damage +50%
Roenier / Roelayne Set
125
Increased Critical Damage +70%
Critical Chance +35%
Increased Attack +15%
STR +35
Psykeeper
Spoiler
Set Name
Level Required
Set Effect
Ropang / Roshel Set
75
Decreased MP Consumption +15%
Decreased Casting Time +10%
Increased HP +10%
DEF +22
Geniun / Gynas Set
90
DEF +47
Decreased Casting Time +20%
INT +20
Mekatro / Mekaron Set
105
PvE Damage Increase +8%
Decreased Casting Time +15%
Increased HP +15%
DEF +22
Psykon / Psyuniper Set
105
Increased DEF +20%
Ranged Block +20%
Melee Block +20%
Increased HP +15%
Twilight Set
120
Increased Attack +10%
Increased HP +15%
Decreased Casting Time +20%
INT +20
Reffiro / Rephira Set
125
PvE Damage Increase +10%
Increased Attack +20%
Decreased Casting Time +30%
INT +50
Elementor
Spoiler
Set Name
Level Required
Set Effect
Myuran / Myurian Set
75
Decreased Casting Time +15%
Increased HP +10%
INT +15
DEF +22
Elder / Ellean Set
90
Speed +10%
INT +15
Decreased Casting Time +15%
DEF +24
Shabel / Shurian Set
105
Increased HP +15%
Decreased Casting Time +20%
INT +10
PvE Damage Increase +5%
Ellis / Ellsis Set
105
Increased DEF +20%
Ranged Block +20%
Melee Block +20%
Increased HP +15%
Nanemvis Set
120
Decreased Casting Time +25%
INT +30
Increased HP +15%
Increased Attack +10%
PvE Damage Increase +5%
Lippin / Lypine Set
125
Decreased Casting Time +30%
INT +35
Increased HP +20%
Increased Attack +20%
PvE Damage Increase +10%
Templar
Spoiler
Set Name
Level Required
Set Effect
Majestic Bileire / Majestic Bilari Set
130
Increased HP +40%
Melee Block +15%
Ranged Block +15%
Increased DEF +25%
[AOE] Dragon Templar Set
Dr. 40
Increased HP +52%
Melee Block +18%
Ranged Block +18%
Increased DEF +35%
[1on1] Dragon Templar Set
Dr. 40
Increased Attack +25%
PvE Damage Increase +25%
Increased Critical Damage +85%
Critical Chance +45%
Slayer
Spoiler
Set Name
Level Required
Set Effect
Piercing Heraud / Piercing Herainn Set
130
Increased DEF +25%
Melee Block +15%
Increased HP +25%
Ranged Block +15%
[AOE] Dragon Slayer Set
Dr. 40
Increased HP +30%
Melee Block +18%
Ranged Block +18%
Increased DEF +30%
[1on1] Dragon Slayer Set
Dr. 40
Increased Attack +30%
Hit +20%
Critical Chance +35%
Increased Critical Damage +70%
Harlequin
Spoiler
Set Name
Level Required
Set Effect
Trickster Curio / Trickster Curena Set
130
Increased DEF +25%
Melee Block +15%
Ranged Block +15%
Increased HP +25%
[AOE] Dragon Harlequin Set
Dr. 40
Increased HP +30%
Increased DEF +30%
Ranged Block +18%
Melee Block +18%
[1on1] Dragon Harlequin Set
Dr. 40
Increased Critical Damage +75%
Hit +25%
Critical Chance +40%
Increased Attack +35%
Crackshooter
Spoiler
Set Name
Level Required
Set Effect
Deadeye's Hainure / Deadeye's Hanira Set
130
Ranged Block +13%
Melee Block +13%
Increased DEF +25%
Increased HP +25%
[AOE] Dragon Crackshooter Set
Dr. 40
Increased HP +30%
Increased DEF +27%
Ranged Block +18%
Melee Block +15%
[1on1] Dragon Crackshooter Set
Dr. 40
PvE Damage Increase +15%
Increased Critical Damage +90%
Increased Attack +20%
Critical Chance +45%
Seraph
Spoiler
Set Name
Level Required
Set Effect
Purifier's Reine / Purifiers Rayne Set
130
Increased HP +30%
INT +50
Decreased Casting Time +35%
Melee Block +20%
Ranged Block +20%
[AOE] Dragon Seraph Set
Dr. 40
Decreased Casting Time +50%
Increased DEF +30%
Ranged Block +18%
Melee Block +18%
Increased HP +42%
[1on1] Dragon Seraph Set
Dr. 40
Hit +10%
Increased Critical Damage +90%
Increased Attack +20%
STR +40
Force Master
Spoiler
Set Name
Level Required
Set Effect
Vigorous Roenier / Vigorous Roelayne Set
130
Increased DEF +25%
Increased HP +25%
Melee Block +15%
Ranged Block +15%
[AOE] Dragon Forcemaster Set
Dr. 40
Increased HP +30%
Increased DEF +30%
Ranged Block +18%
Melee Block +18%
[1on1] Dragon Forcemaster Set
Dr. 40
Increased Critical Damage +90%
Critical Chance +40%
Increased Attack +20%
STR +40
Mentalist
Spoiler
Set Name
Level Required
Set Effect
Cryptic Reffiro / Cryptic Rephira Set
130
Ranged Block +15%
Melee Block +15%
Increased DEF +25%
Increased HP +25%
[AOE] Dragon Mentalist Set
Dr. 40
Increased HP +30%
Increased DEF +30%
Ranged Block +18%
Melee Block +18%
[1on1] Dragon Mentalist Set
Dr. 40
PvE Damage Increase +20%
Increased Attack +30%
Decreased Casting Time +40%
INT +80
Arcanist
Spoiler
Set Name
Level Required
Set Effect
Mystical Lippin / Mystical Lypine Set
130
Ranged Block +15%
Melee Block +15%
Increased DEF +25%
Increased HP +25%
[AOE] Dragon Arcanist Set
Dr. 40
Increased HP +30%
Ranged Block +18%
Melee Block +18%
Increased DEF +30%
[1on1] Dragon Arcanist Set
Dr. 40
Decreased Casting Time +35%
INT +40
Increased HP +25%
Increased Attack +30%
PvE Damage Increase +15%
This Topic might be outdated (Last update 11/6/20). For an up-to-date overview use the Item Wiki ingame.
Vexx 11.06.2020
In-Game Titles
Caesium 08.05.2020
Title
Requirements
Master Collector
Collect 1,440 Times
Entrepreneur
Trade 2,160 Times
Master Hatcher
Hatch 100 Eggs
Casanova
Create 100 Couples
Great Couple
Have Couple Level 21
Dreaful Fellow
Have 10 PVP Points
Dreaful Fellow
Have 5 PVP Points
Novice Fighter
Have 10 PVP Points
Apprentice Fighter
Have 100 PVP Points
Presistant Fighter
Have 1,000 PVP Points
Devoted Fighter
Have 4,000 PVP Points
Passionate Fighter
Have 10,000 PVP Points
Unyeilding Fighter
Have 20,000 PVP Points
Prizewinning Fighter
Have 50,000 PVP Points
Renowned Fighter
Have 1,000,000 PVP Points
Epic Fighter
Have 5,000,000 PVP Points
Champion Fighter
Have 100,000,000 PVP Points
Master Knight
Be A Master Knight
Master Blade
Be A Master Blade
Master Jester
Be A Master Jester
Master Ranger
Be A Master Ranger
Master Billposter
Be A Master Billposter
Master Ringmaster
Be A Master Ringmaster
Master Psykeeper
Be A Master Psykeeper
Master Elementor
Be A Master Elementor
Hero Knight
Be A Hero Knight
Hero Blade
Be A Hero Blade
Hero Jester
Be A Hero Jester
Hero Ranger
Be A Hero Ranger
Hero Billposter
Be A Hero Billposter
Hero Ringmaster
Be A Hero Ringmaster
Hero Psykeeper
Be A Hero Psykeeper
Hero Elementor
Be A Hero Elementor
Lord
Be The Current Lord
Lord
Be The Current Lord
Gray Pill Addict
Consume 30,000 Gray Pills
Yellow Pill Addict
Consume 30,000 Yellow Pills
Blue Pill Addict
Consume 30,000 Blue Pills
Red Pill Addict
Consume 30,000 Red Pills
Gold Pill Addict
Consume 30,000 Gold Pills
Mysterious Pill Addict
Consume 30,000 Mysterious Pills
Lollipop Addict
Consume 200,000 Lollipops
Biscuit Addict
Consume 200,000 Biscuits
Chocolate Bar Addict
Consume 200,000 Chocolate Bars
Milk Addict
Consume 200,000 Milks
Roll Bread Addict
Consume 200,000 Roll Breads
Hot Dog Addict
Consume 200,000 Hot Dogs
Pizza Addict
Consume 200,000 Pizzas
Kimbap Addict
Consume 200,000 Kimbaps
Chicken Addict
Consume 200,000 Chickens
Star Candy Addict
Consume 200,000 Star Candys
Meat Skewer Addict
Consume 200,000 Meat Skewers
Barbecue Addict
Consume 200000 Barbecues
Seafood Pan Cake Addict
Consume 200,000 Seafood Pan Cakes
Fish Soup Addict
Consume 200,000 Fish Soups
Sausage Casserole Addict
Consume 200,000 Sausage Casseroles
Fish Stew Addict
Consume 200,000 Fish Stews
Steamed Seafood Addict
Consume 200,000 Steamed Seafoods
Meat Salad Addict
Consume 200,000 Meat Salads
Gratin Addict
Consume 200,000 Gratins
Seafood Pizza Addict
Consume 200,000 Seafood Pizzas
Orange Juice Addict
Consume 200,000 Orange Juices
Strawberry Shake Addict
Consume 200,000 Strawberry Shakes
Pineapple Cone Addict
Consume 200,000 Pineapple Cones
Banana Jujubar Addict
Consume 200,000 Banana Jujubars
Fruit Juice Addict
Consume 200,000 Fruit Juices
Fruit Icewater Addict
Consume 200,000 Fruit Icewaters
Fruit Parfait Addict
Consume 200,000 Fruit Parfaits
Fruit Sherbert Addict
Consume 200,000 Fruit Sherberts
Icecream Addict
Consume 200,000 Icecreams
Fruit Punch Addict
Consume 200,000 Fruit Punchs
Aibatt Hunter
Kill 15,000 Aibatt
Lawolf Hunter
Kill 15,000 Lawolf
Cardpuppet Hunter
Kill 15,000 Cardpuppet
Glaphan Hunter
Kill 15,000 Glaphan
Meteonyker Hunter
Kill 15,000 Meteonyker
Cyclops X Hunter
Kill 15,000 Cyclops X
Yetti Hunter
Kill 15,000 Yetti
Mutant Yetti Hunter
Kill 15,000 Mutant Yetti
Augu Hunter
Kill 15,000 Augu
Mutant AuguHunter
Kill 15,000 Mutant Augu
Ghostly Prince Hunter
Kill 15,000 Ghostly Prince
Ghostly King Hunter
Kill 15,000 Ghostly King
Mammoth Hunter
Kill 15,000 Mammoth
Cannibal Mammoth Hunter
Kill 15,000 Cannibal Mammoth
Kingster Hunter
Kill 15,000 Kingster
Kragen Hunter
Kill 15,000 Kragen
Crepper Hunter
Kill 15,000 Crepper
Naga Hunter
Kill 15,000 Naga
Atrox Hunter
Kill 15,000 Atrox
Okean Hunter
Kill 15,000 Okean
Tigar Hunter
Kill 15,000 Tigar
Dorian Hunter
Kill 15,000 Dorian
Meral Hunter
Kill 15,000 Meral
Clockworks Killer
Kill 100 Clockworks
Red Dragon Hunter
Kill 100 Meteonyker
Auraclaw Hunter
Kill 15,000 Auraclaw
Stonestrike Hunter
Kill 15,000 Stonestrike
Thunder Lizard Hunter
Kill 15,000 Thunder Lizard
Angry Tumor Hunter
Kill 15,000 Angry Tumor
Fogscream Hunter
Kill 15,000 Fogscream
Ashbeast Hunter
Kill 15,000 Ashbeast
Dawntooth Hunter
Kill 15,000 Dawntooth
Hellstep Hunter
Kill 15,000 Hellstep
Blightface Hunter
Kill 15,000 Blightface
Living Fire Hunter
Kill 15,000 Living Fire
Crimson Killer
Kill 100 Crimson
Retjack Killer
Kill 100 Retjack
Crystal Demon Killer
Kill 100 Crystal Demon
Fire Basilisk Killer
Kill 100 Fire Basilisk
Tramnuk Farmer
Kill 100 Beast Overlord Khan
Vampire Killer
Kill 100 Drakul the Diabolic
Aminus Hunter
Kill 100 Dread Drakul the Diabolic
Devos Killer
Kill 100
Behemoth Killer
Kill 100 Behemoth
Kalgas Killer
Kill 100 Kalgas
DC Addict [Event Only]
Kill 20 Baby Crimsons
Winter Crusade Quest Guide
Jesline 30.04.2020
This quest allows you to exchange your Dragon Ore and Dragon Map for a big amount of Dragon Chips where you can exchange it for rare items on [Dragon Chip Dealer] Jeff in Flaris but first, you need to follow this steps to do so.
Step !: Press V and Teleport on Winter Crusade Map
Step 2: Find [NPC] Fast kopfloser Nick and do the quest "Winter Crusade (1/2)" where you need to exchange
6 Dragon Ore's and 1 Dragon Map to get 2 pcs of Cursed Dragon Gold after that, get the quest "Winter Crusade (2/2)" to exchange your Cursed Dragon Gold for Dragon Chips
Step 3: Do the quest of Winter Crusade (2/2)
Step 4: Find the Cursed Dragon near Mammoth then press okay and you will get 3k Dragon Chips
Tip: Make a speed set or boost your speed to finish the quest fast.
[i]Note: You can repeat the quest as long as you have enough Dragon Ore's and Dragon Map's
[/i]
Rainbow Race Guide
Jesline 26.04.2020
The Rainbow Race is an event that occurs three times a week, happening every Friday, Saturday and Sunday. During the race, players must soar across the continent to win the race. However, the speed of character/vehicle is not the only factor for winning. They must also complete 7 mini-games in random order to finish the race. Each mini-game will be provided by Rainbow Race Spirits NPCs (With Designated Color) scattered all over the world of Madrigal.
How to Apply
• Go to Channel 1. (You have to be on Channel 1 to play the game)
• Go to Darkon City near the bank, there's an NPC Called Rainbow Race Officer.
• Click on NPC [Rainbow Race Officer] & Click on Apply for the Rainbow Race.
• You should have 1,000,000 Penya & any flying vehicle in your inventory.
Schedule
Rainbow Race Event is held on Channel 1, 3 times a week.
Day
Friday
Saturday
Sunday
Application Opens
N/A
12:00PM (UCT+2)
12:00PM (UCT+2)
Application End
N/A
2:00PM (UTC+2)
2:00PM (UTC+2)
Rainbow Race Start
2:00 AM (UTC+2)
2:40PM (UTC+2)
4:40PM (UTC+2)
Rules and Guidelines
1. The Rainbow Race only takes place on Channel 1.
2. Being online on Channel 1 is important because you will be disqualified if the race starts and you are not online.
3. You also will be disqualified, If your client Crash/Freeze Or your Network disconnects you.
4. Once the event has begun, an icon appears at the bottom of the navigator. You can check the status/details of the race by clicking it.
5. The highlighted mini game is where YOU start. Each mini game highlights in its color. Green for Green's mini-game, Red for Red's mini-game and so on and so forth.
6. After completing the 7 mini games, the characters should go back to the NPC [Rainbow Race Officer] in Darken and press ‘Confirm Completion of the Rainbow Race’.
7. The items listed below cannot be used during the race.
• Tickets
• Blink-wings
• Instant Teleport
• Lord Skill
Seven Mini-games
1. Rock-Paper-Scissors [Red]
Goal: Win 3 consecutive rounds of Kawi Bawi Bo (Rock Paper Scissors)
2. Lucky Roller [Orange]
Goal: Roll the dice until the total equals the NPCs roll
3. Anything but Math [Yellow]
Goal: Solve 5 consecutive math equations
4. Stopwatch [Green]
Goal: Press the stop button within .03 seconds of the time given by NPC
5. Typo [Blue]
Goal: Type the exact letters and numbers given by the NPC
6. Concentration [Indigo]
Goal: Match all the Masquerpets to win
7. Drop the Ball [Violet]
Goal: Predict the winning hole.
Rewards
1. Penya Rewards by percentage.
• 1st Place______50% of total application fees.
• 2nd Place_____24% of total application fees.
• 3rd Place_____12% of total application fees.
• 4th Place______6% of total application fees.
• 5th Place______3% of total application fees.
2. Item Rewards by completing Mini-Games.
• 1st Mini-Game____Nothing
• 2nd Mini-Game___Nothing
• 3rd Mini-Game ___Nothing
• 4th Mini-Game ___Fireshower
• 5th Mini-Game ___1 Rainbow Box
• 6th Mini-Game ___2 Rainbow Box
• 7th Mini-Game ___4 Rainbow Box
Note: Penya reward will gradually increase up to 1b every Sunday if there are 25 player applicants.
Rainbow Boxes
Each Rainbow Box has a chance to give one of the following items.
• Lucky Donate Treasure (check Item Wiki to see what’s inside)
• Mysterious Pill
• Scroll of Amplification ES(Event)
• Event Token
• Purple Cotton Candy
• Blue Cotton Candy
• Green Cotton Candy
• Red Cotton Candy
• Sky-Blue Cotton Candy
• Pink Cotton Candy
• Yellow Cotton Candy
• White Cotton Candy
• Gray Cotton Candy
• Orange Cotton Candy
• Aibatt Trans
• Nyang Nyang Trans
• Firecracker box
• Moonstone
• Sunstone
• 1 Day Extra Bag
• Copper Battery (1 day)
• 1 Day Full-shout
Note: All items are rewarded to everyone who finished at least 4 of any of the games even if you're the last to finish the race. All Rainbow Boxes are Event Reward, so it cannot be traded. However; the items you get from Rainbow Boxes are trade-able. There will be some changes in the prizes in the future
DANI 30.04.2020
How To Gain Penya?
Jesline 28.04.2020
1. Arena Farming
This is the easiest thing to do to gain Penya for new-comers. You will only go to the center of the arena which drops random Penya which ranges 500k to 8m that depends on the number of players or how long before you get the Penya.
2. Giant or Boss Hunting
One of the fastest ways to gain Penya. You just need to rush your level up to 110-M to 115-M then after you do that stop your EXP (Press H), from there farm all the bosses of Khaldera Camp, Darkon Dessert & Darkon Glaphan. Khaldera Camp compose of 5 Bosses which gives 4 of them an 18m to 19m per boss and 1 for 11m to 13m Penya. Getting them all will give you approximately 90m with 4 Channels available (90m X 4 = 360m) if you get them all. Darkon Dessert & D. Glaphan will also give 5m to 10m per boss/giant.
• Why 110-M to 115-M?
You can do it at normal levels but doing it at the suggested level will not only make you faster to kill the monster. It will also make you safe from the boss damage (9k-12k boss crit damage). Also take note that the higher the level, the less Penya you get.
Note: Respawn time of boss/giants are different (not 100% accurate).
Channel 1 = 20 to 30 mins respawn time
Channel 2 to Channel 4 = 1hr + respawn time
3. Dekane Mines
This is a pretty easy dungeon where you can hunt sunstone, moonstone, and grab bags scroll. By doing 6 runs every day, you can at least get 100 to 150 moons per day as well as 30-50 grab bags. You can use and can sell moons for 200 to 500k each, sunstone for 100-200k each, and grabs for 1m each (it depends also on the demand and supply in-game). This map also randomly gives you a penya drop of 500k to 1m on mini-bosses and 3m to 28m on Final Boss. Dekane Mines also drop a very unique quest item (Ancient Sarcophagus Opener) that you will need for the higher-level dungeon where you can sell for 50 to 100m (still depends on the demand in-game) or just use it in the future. There is also a quest inside where you can get 15m when you finish it.
4. Collecting Area
This is one of the easiest ways to do, you can gain penya even when you are sleeping or AFK. Make a collector character, it should be level 15 and above and buy a collector on Collector Manager Collins for 1m, after that upgrade your collector into +5 using moonstone and get batteries (you can purchase on vote shop, dragon chip dealer or get some on boxes) and then your good to go, just collect on channel 4 for the non-premium user. Sell premiums like FLY, FITA for 50 to 100k each and Upcut Stone for 1m to 1.5m each. Most importantly you can also get a collector chip (in-demand on market) which you can sell for 170 to 200k each.
5. Animus Boxes
A method that will require you to enter the Animuskrypta and Cursed Animus Dungeon, but not to kill the boss but to get the treasures inside. Both dungeons have 4 Treasure where you can find the exact location on Google. You just need to get the treasure every runs which contains a very useful item that can be sold for a good price. Treasures contain A cards, 7% Card, Remantis, Sunstone, Moonstone, Shining Oricalcum, and many more. Remantis can be sold for 500k to 1m each while A cards and 7% cards price are 50m to 700m.
6. Dragon Ores & Dragon Maps
This quest item will make you get dragon chips. Dragon ores and dragon maps can be obtained by doing daily dungeons and daily quests. 6 Dragon ores and 1 dragon map can be exchanged on Winter Crusade (Azria Map) Quest near Forgotten King, you will get 2 Cursed Dragon Gold, that you can exchange for 3k Dragon Chips on NPC near Mountains of the mammoth. 1k Dragon Chips or 1 Dragon Perin can be sold for 25-35m each.
7. Meteonyker Hunting
This method will require a decent gear. Meteonyker has 3 kinds (red, blue and green). Each kind of Meteonyker can be killed 5 times which gives Bloody sets, bloody weapons and +20 normal accessories not only it gives 7m to 11m Penya per kill, it also gives you NPC weapons where you can sold for 1m to 2m each on any NPC. In this dungeon, you can get at least 300m to 350m per day added to the Penya you will get on selling rare parts, weapons and accessories.
8. World Boss Hunting
A method that will require you to hunt 7 kinds of world bosses. Each world boss has 10 locations around Madrigal, the higher the level the stronger the world boss is. World boss drops remantis and Dragon Balls which you can sell for 100m to 150m each. Take note that each world boss has a respawn time of 24hours (not 100% accurate) and change location when it's not been killed every 1hr.
List of Location:
• Darkon 1 to 3
• Darkon Dessert/ Darkon Glaphan
• Khaldera Camp
•Valley of Risen
• Elliun City
• Bahara Dessert
• Crystal Labyrinth
• Fire Land
• Crystal Demon
8. Dragon Island Farming
A special map that focuses on farming. It has a higher rate of moonstone, sunstone, Dragon Chips, Dragon Crystal, Grab bag scrolls, and a rainbow flower ( a quest item that gives more experience on guild leveling) which you can sell for 200k to 500k each.
9. Weapon Dust
This will make your unused stocks of Ultimate Weapon that can't be sold use-full. You can exchange your Ultimate Weapon on the City of Gods for weapon dust which gives you a random amount of Penya.
Note: Weapon dust pieces vary on the level, gear score, and upgrade of the ultimate weapon
10. Donate Points
This is one of the easiest you can do to gain Penya very fast because many players need it in-game.
Note: This method is only one of the many ways to gain Penya in-game primarily for newbies. If there is any method that you want to add, kindly message me. Prices of items still depend on the demand and supply in-game. Thank you and Goodluck!
Player Event System
Rojan 16.10.2019
Players are only allowed to start player event on the following schedules:
UTC +1
12:00 AM
3:00 AM
2:00 PM
7:00 PM
UTC + 5
5:00 PM
8:00 PM
7:00 PM
12:00 PM
UTC +8
6:00 AM
9:00 AM
8:00 PM
1:00 AM
Below are the event rates with their corresponding prices:
5%
10%
15%
20%
25%
30%
35%
40%
45%
50%
10m
20m
30m
40m
50m
60m
60m
128m
144m
160m
5%
10%
15%
20%
25%
30%
35%
40%
45%
50%
300m
600m
900m
1.2b
1.5b
1.8b
2.1b
2.4b
2.7b
3b
P.S. Please note that 50% fee will also be deducted from the lord bank.
Pet Guide
Caesium 19.06.2019
Getting A Pet
Pets hatch from Eggs, you are able to obtain an Egg from the [Pet Tamer].
First way to have a pet is to hatch an egg, you must go the the Pet Tamer and do his quest. You must either kill monster with your Egg to get its experience to 99.99% or use an Egg Hatcher obtainable from Grab Bag (Pet Accessories). Once this happens take your egg to a Pet Tamer NPC to get it hatched. A random Pet will hatch from the egg.
Types Of Pets
Unicorn
This beautiful unicorn is a great companion for your journey in Dragon Crusade. With this pet, you will gain extra Health Points.
Babari Lion
The king of the jungle is a powerful animal that you can tame. With this companion, you will gain extra Stamina.
White Tiger
The fierce tiger is a great partner for those who like to be up close and personal in battles. With this beast, you will gain extra Strength.
Rabbit
This cute rabbit is quick and great at performing difficult actions. With this furry friend, you will gain extra Dexterity.
Old Fox
To this day, we still don't know what sound it makes. With this mysterious partner, you will gain extra Intelligence.
Griffin
The majestic griffin is a monster when it feels threatened. With this creature, you will gain extra Experience.
Dragon
This ancient creature is a fierce beast to be wrecker with. With this mythical beast, you will gain extra Attack.
Leveling Your Pet
Click on your Pet and select Pet Status to view Pet information. Your pet will lose 1 point of HP per second while it is summoned. Feeding Pet Feed to your Pet regenerates 2 HP per 1 Pet Feed. Your pet will gain experience as you kill monsters, information which you can find below.
Spoiler
Pet Class
EXP Per Monster Kill *Same Level Monster*
Egg
0.12%
D~C
0.06%
C~B
0.035%
B~A
0.016%
A~S
0.005%
S
0%
Collector Guide
Caesium 13.06.2019
You can teleport to the collection area by pressing V. In order to collect, you must either be on channel 4 or have an active Premium running. You can set up to 3 normal collector chars. If your character have an active premium, it does not count towards the limit of 3.
Collector Chip
Carbonara (MP 20,000 Recovery)
Lasagna (HP 20,000 Recovery)
Penne (FP 20,000 Recovery)
FITA cookie (F)
FITA cookie (I)
FITA cookie (T)
FITA cookie (A)
Letter
Letter
Letter
Refresher Hold
Vital Drink X
Gold Pill (HP 8,000 Recovery)
Upcut Stone (Collector)
Moonstone Piece
Topaz Piece
Ruby Piece
Diamond Piece
Ocean Card (4%) Piece
Vacuum Card (4%) Piece
Earthquake Card (4%) Piece
Volcano Card (4%) Piece
Lightning Card (4%) Piece
Pink Balloon (Increased Attack +5%)
Blue Balloon (Increased DEF +5%)
Yellow Balloon (Increased HP +5%)
Guild Buffs
Caesium 11.06.2019
Your guild is given 100 guild siege points whenever your guild participates in a guild siege. Every Saturday, 50 guild siege points are deducted from your guild, but if you keep participating in guild sieges, your buffs will remain active.
Guild Buff Level 1

Effect:
Attack +8%
Guild Level Required: 10
Guild Members Required: 3
Guild Siege Points Required: 0
Guild Buff Level 2

Effect:
Exp +8%
Guild Level Required: 20
Guild Members Required: 5
Guild Siege Points Required: 50
Guild Buff Level 3

Effect:
HP +8%
Guild Level Required: 30
Guild Members Required: 10
Guild Siege Points Required: 200
Guild Buff Level 4

Effect:
PvE Damage +8%
Guild Level Required: 40
Guild Members Required: 15
Guild Siege Points Required: 250
Guild Buff Level 5

Effect:
All Stats +8
Damage Absorb +6
Speed +8%
Guild Level Required: 50
Guild Members Required: 20
Guild Siege Points Required: 300
Bonus Guild Buff Level 1

Effects:
Exp +4%
Increase Critical Damage +4%
Hit +4%
Guild Level Required: 10
Guild Members Required: 3
Guild Siege Points Required: 350
Bonus Guild Buff Level 2

Effects:
Exp +4%
Increase Critical Damage +8%
Hit +8%
Guild Level Required: 10
Guild Members Required: 3
Guild Siege Points Required: 450
Unltimate Passive Guild Buff

Effects:
All Stats +8
PvP Damage Increase +5
PvE Damage Increase +5%
Guild Level Required: 60
Guild Members Required: 20
Guild Siege Points Required: 800
Mounts Preview
Caesium 09.06.2019
[strike]You can view all current mounts here: https://imgur.com/a/CkfIEMx
Each mount has its own animation, gifs will be uploaded in the future.[/strike]